The woorkup.com blog was under the wpseer.com domain until I migrated it a few years back. I acquired wpseer.com and shifted to a new name because this is not just a WordPress site but is targeted to many other types of marketers.

One issue I ran into was that while I had wpseer.com up, I had migrated it to HTTPS. So when I went to move to the woorkup.com domain, I had backlinks on both the HTTP and HTTPS versions. The problem was I didn’t want to keep that WordPress site up and running just for the 301 redirects. And that is where Cloudflare came to the rescue with free URL forwarding.
Follow the tutorial below on how to set up free URL forwarding with Cloudflare, along with 301 wildcard redirects. I’ve also included an alternative method you can do if your hosting provider supports it.
Free URL forwarding with Cloudflare
A while back, I wrote a post about how to implement wildcard 301 URL forwarding with your domain registrar. However, the problem with that is, you can only do the HTTP version because doing URL forwarding from HTTPS requires having an SSL certificate installed.
The great news is you can do this with Cloudflare, even if there is no hosting connected to it. And what do I mean by a wildcard redirect? It means that any traffic that tries to access domain1.com/blog redirects to domain2.com/blog. So in this instance, the following 301 redirects work:
- http://wpseer.com/ 301 redirects to https://woorkup.com
- https://wpseer.com/ 301 redirects to https://woorkup.com
- http://wpseer.com/* 301 redirects to https://woorkup.com/*
- https://wpseer.com/* 301 redirects to https://woorkup.com/*
This ensures that all the backlinks on both the HTTP and HTTPS versions don’t break for SEO purposes. Remember, 301 redirects are needed to pass link juice. And this, of course, assumes that your URL structure remains the same on the new domain.
Step 1
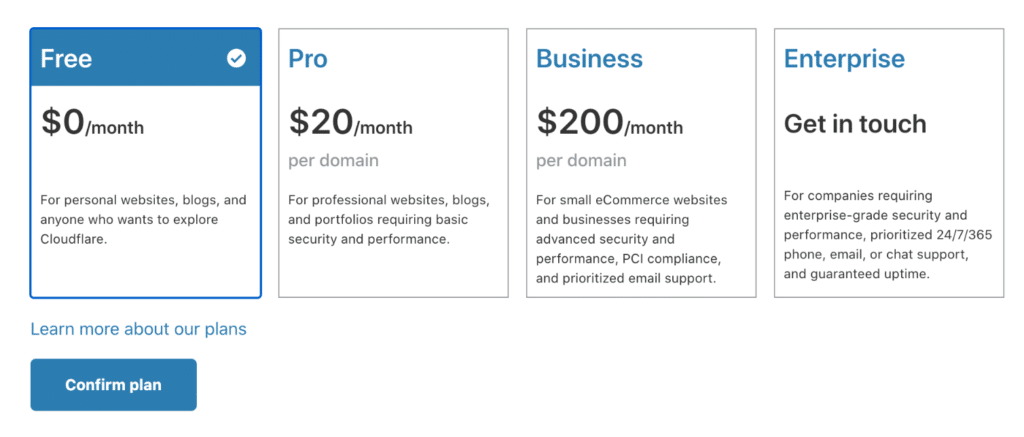
First, you must add the domain that you want to redirect to Cloudflare. Simply signup for a free account and click on “+ Add Site.” The free plan works fine.
Step 2
Cloudflare will attempt to scan your domain for any existing DNS records. Simply delete everything it finds (unless you have email or something else you need).
You will want to add two dummy records. Basically, you are going to point the domain to an IP address that doesn’t exist. This is because all you need is the URL forwarding to work. Add the following:
| Type | Name | Value | TTL | Proxy status |
|---|---|---|---|---|
| A | @ | 192.0.2.1 | Automatic | Orange cloud |
| A | www | 192.0.2.1 | Automatic | Orange cloud |
The 192.0.2.1 is an IP address that goes nowhere. Make sure you have the orange cloud enabled, as proxying to Cloudflare has to be on for the redirects to work.

Once you’ve configured the DNS records click “Continue.”
Step 3
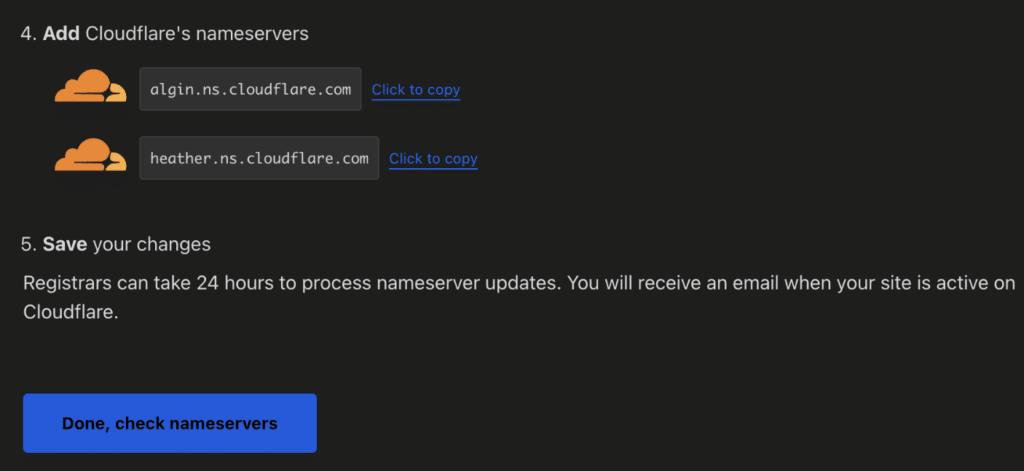
You will then need to point your current domain to the Cloudflare nameservers. You can do this at your domain registrar. Then click “Done, check nameservers.”
Step 4
Under the “SSL/TLS” menu, select “Flexible” SSL. You will need this to ensure that redirects over HTTPS also work.
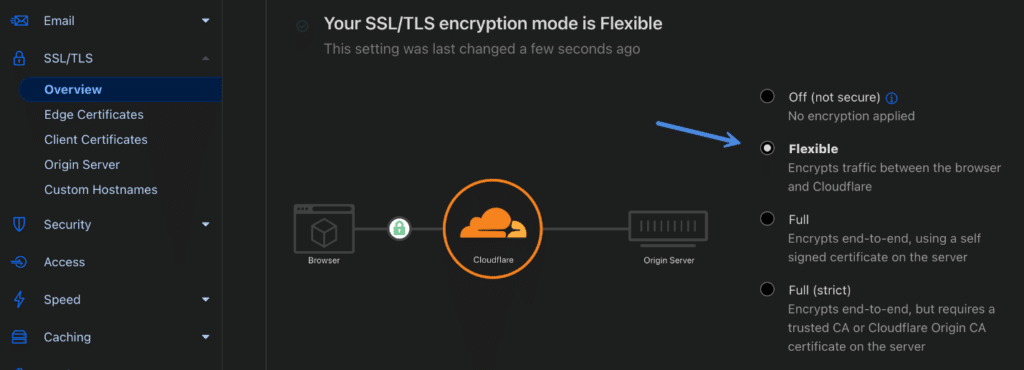
This is because your origin server doesn’t support HTTPS, as it doesn’t exist. Remember, we are pointing to dummy IPs. Flexible SSL enables a universal SSL certificate on both *.domain.com and domain.com. However, it can take a bit to start working, usually within 15 minutes of pointing your domain to Cloudflare.
Flexible SSL uses SNI and works on the following browsers:
Desktop Browsers installed on Windows Vista or OS X 10.6 or later:
- Internet Explorer 7
- Firefox 2
- Opera 8 (with TLS 1.1 enabled)
- Google Chrome v5.0.342.0
- Safari 2.1
Mobile Browsers
- Mobile Safari for iOS 4.0
- Android 3.0 (Honeycomb) and later
- Windows Phone 7
Step 5
Under the “Page Rules” menu, click on “Create Page Rule.”
You will then want to enter the following pattern:
*yourdomain.com/*
Select “Forwarding URL” and “301 – Permanent Redirect” for the settings, and input the following rule:
https://yourdomain.com/$2
The /$2 enables the wildcard part to function.
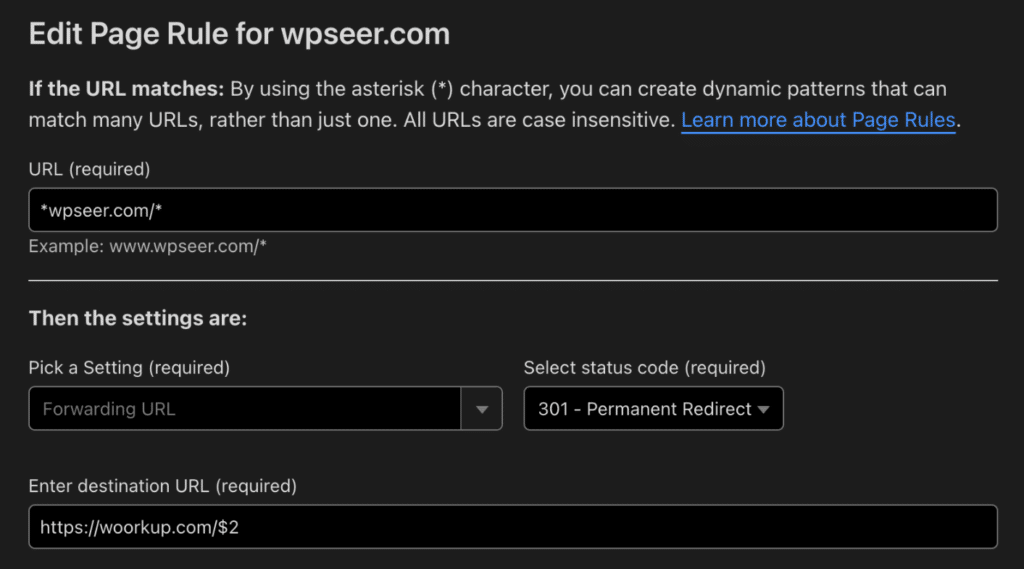
Then click on “Save and Deploy.”
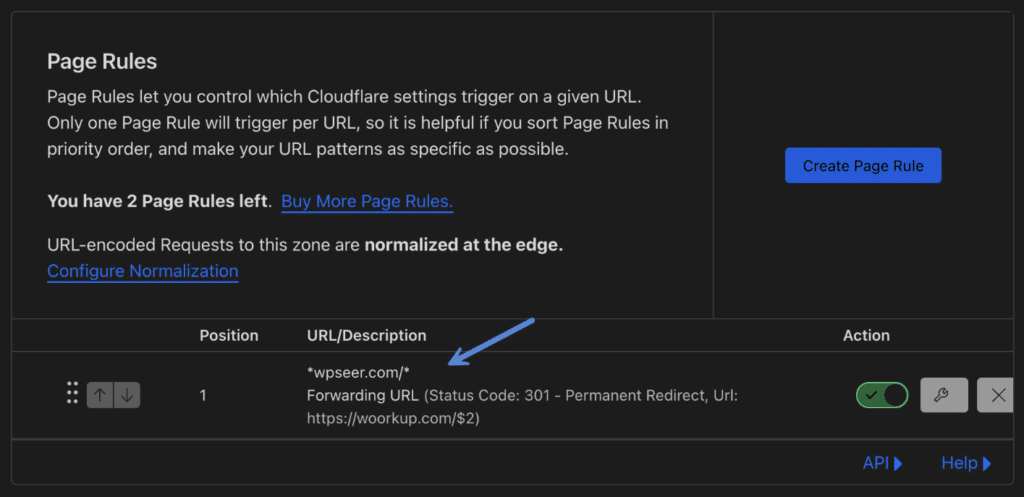
The single rule above makes the following work:
- http://wpseer.com/ 301 redirects to https://woorkup.com
- https://wpseer.com/ 301 redirects to https://woorkup.com
- http://wpseer.com/* 301 redirects to https://woorkup.com/*
- https://wpseer.com/* 301 redirects to https://woorkup.com/*
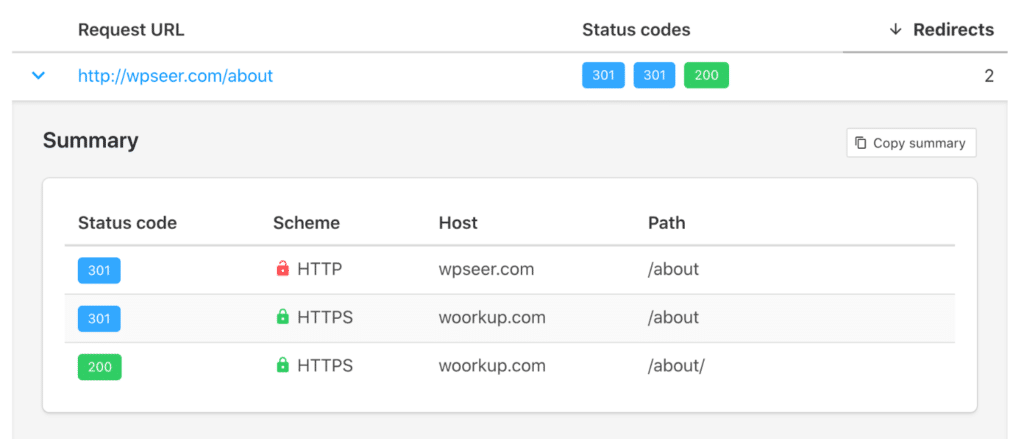
Read more about Cloudflare page rules. And that’s it! You can now ditch the hosting plan on your old domain, and your wildcard 301 redirects will now be in place forever, pointing to your new domain. You can easily test different variations with httpstatus.
An alternative method with Kinsta
The whole point of the tutorial is that you don’t want to or can’t keep your old domain up forever just for the redirects. But you need to due to SEO, traffic, and old backlinks. If you’re using a hosting provider like Kinsta, you can also accomplish the same thing without taking up an extra site slot on your hosting plan. Here’s how.
Step 1
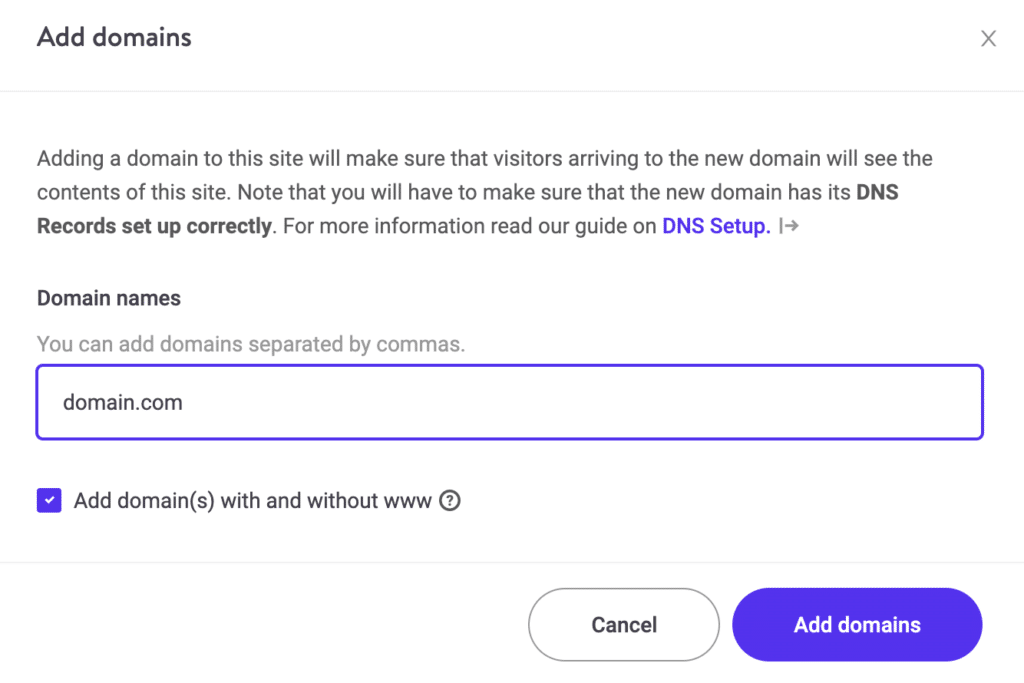
In your MyKinsta dashboard go to the domain that you are wanting to redirect or forward the old domain to. So in this example, I go to my woorkup.com site and add wpseer.com (old domain).
Add a domain to your existing site. Yes, many don’t realize you can actually add as many domains as you want onto existing sites. Make sure to keep the “Add domain with and without www” checked if you want to redirect both versions.
Step 2
Point the old domain to Kinsta’s servers if you haven’t already, and give it a little time to propagate. You can check it with a tool like whatsmydns.
Step 3
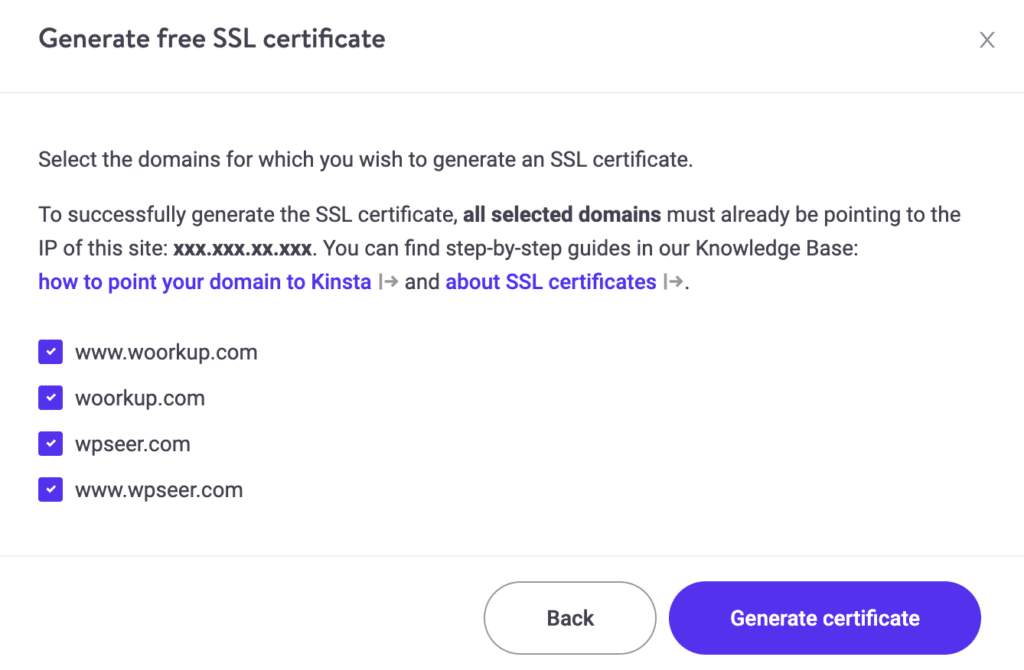
Then go to “Tools” and under “SSL certificate” click on “Update Let’s Encrypt certificate.”
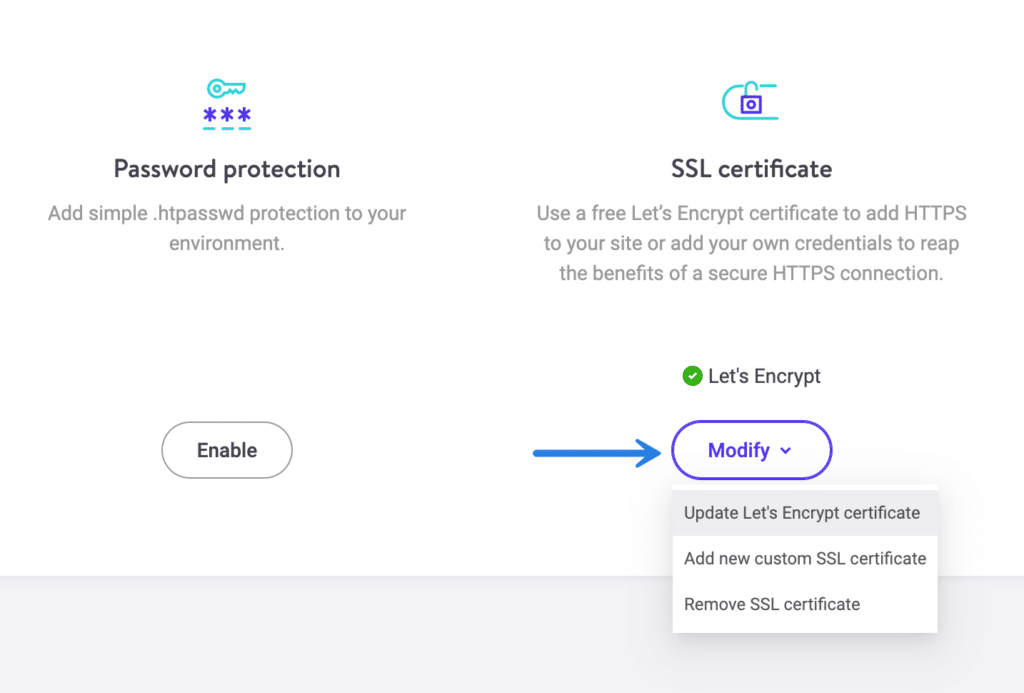
You will want to generate a certificate for the old domain (wpseer.com). This is important because it enables you to add redirects for HTTPS versions of the old domain, even though the domain isn’t technically hosted anywhere.
Step 4
Then go to “Redirects” and add a wildcard redirect. Choose your old domain, which is now available since you added it to your site.
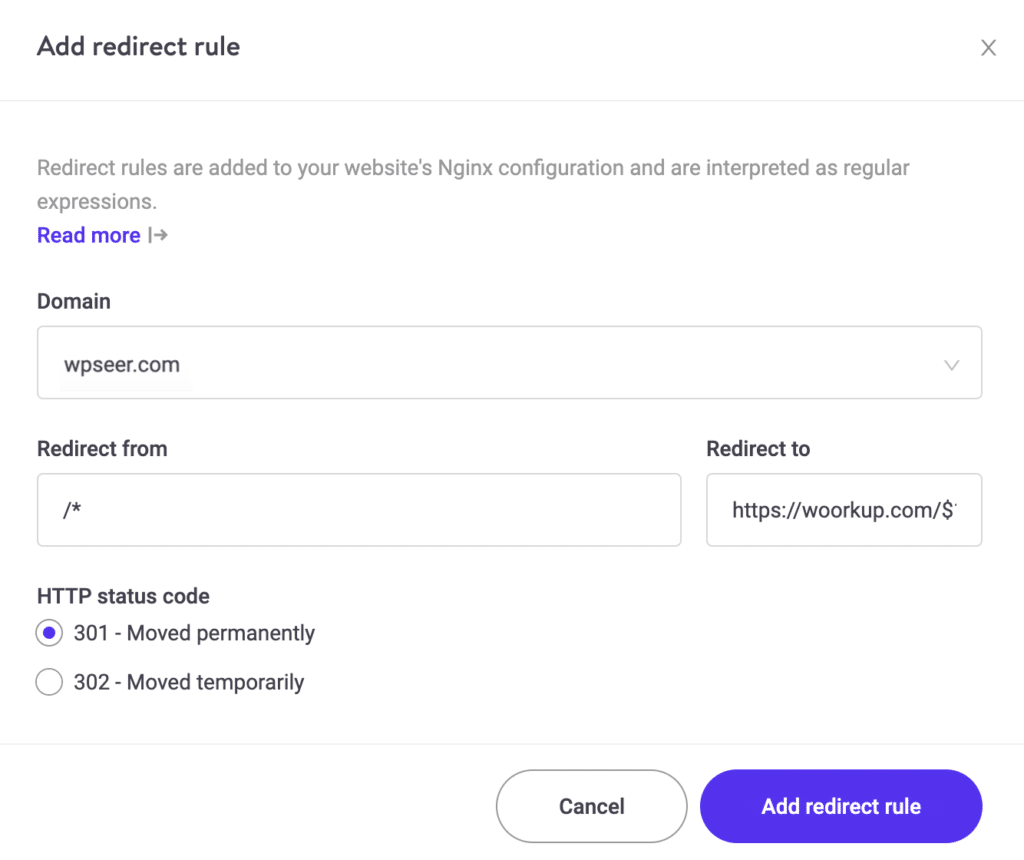
Your “Redirect from” would the following:
/*
And then you want to redirect it to your new domain:
https://yourdomain.com/$1
And that’s it. Now your old domain has a wildcard 301 redirect over to your new domain.
Summary
Hopefully, this tutorial on how to set up free URL forwarding and redirects will help you on your next migration or domain name change. If you have any questions, feel free to drop them below in the comments.
Will the single page rule (https://domain. com/*) redirect http://domain. com/* too?
Yes, it will. You can even test this on my wpseer site which has this running. The above rule makes the following all work:
http://wpseer.com/301 redirects tohttps://woorkup.comhttps://wpseer.com/301 redirects tohttps://woorkup.comhttp://wpseer.com/*301 redirects tohttps://woorkup.com/*https://wpseer.com/*301 redirects tohttps://woorkup.com/*I have updated the post now to make that more clear. I could definitely see why you might have thought there would have been more rules… so thanks for the heads up.
Sweet!
Brian, thank you. GREAT tutorial. Could you please tell me how to forward the www version of the domain as well as that’s the one that doesn’t seem to be working for me? Much appreciated!
I think I found it, just add an asterisk. Eg. *yourdomain.com/* seems to redirect both verions. www and non-www.
Thanks!!!
Nice article full of useful information glad that you share this with us. :)
Thanks Brian we’re switching to a new domain with the startup I’m working for. This will def come in handy!
Great, glad it was helpful! I have this in place on a couple domains I have migrated and it works perfectly.
Thankyou. But I think redirect check only work in httpstatus io. I have check at redirect-checker org doesnt work. Can you explain that? Thanks
Hey Adjie,
I would have to see it, so I’m not sure. However, I replaced HTTP Status tool above with Redirect Tracker. No ads :)
just wanted to tell you thank you,
i just did a 301 and yeah i was facing the same problem. cloudflare was redirecting all the domains to home page but with $1 it redirected to the relevant pages.
Excellent information. Thank you so much for saving my time and very accurate information.
Great walk-through. Even though Cloudflare dashboard/layout has changed some of these the steps are still spot on – things are just in different places.
Thanks Brian
This was an amazing tutorial that totally solved my hot redirect probs. I actually needed 34 redirects from an old domain I’m sunsetting to a new domain, and the old domain’s web host would not allow off-domain redirects. This totally saved me from having to switch hosts and pay for yet another host, most of which don’t let you forward your home url because it’s “reserved” for a homepage. With Cloudflare I was able to do that, although their free plan only supports 10 single “rule” redirects plus 20 more via their Bulk Redirect List, so I got 30 instead of 34. But that was good enough! Thanks again, your post was super helpful.
Great, glad it was helpful!