Finding the CID
One of my coworkers recently became a Google Trusted Photographer and in doing this he let me in on how their system works. Let me just say it needs a lot of polishing. First of all Google is very picky about your pano shots and then when it comes to getting them uploaded on the correct Google+ map listing it is almost a nightmare; especially if you are juggling multiple listings and locations. Their documentation is horrible and very confusing. If you are pulling your hair out trying to figure out how to get your panorama shots onto the correct Google+ page just follow the instructions below.
Step 1
[alert-note]First what Google doesn’t tell you is that your CID (the number you need to upload your Panos with) is simply our Google+ page #.[/alert-note]If you or the business has already chosen a name for the page then the Google+ page URL probably has the name in it instead of the CID as seen below in my example.

So you will need to find the CID another way.
Step 2 (option 1 – If you are a manager)
So go ahead and click on the “Manage this page” button.

After you are into the dashboard the URL in your address bar will now show the CID.

Step 2 (option 2 – If you aren’t a manager)
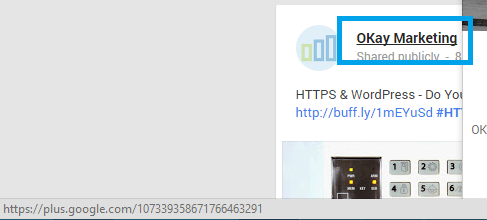
If you aren’t a manager and don’t have access to the Google+ page dashboard you can also hover over the latest post on the page (business name) and it will show you the CID in the status bar of your browser.

Step 3
Once you have the CID you have to take this to Google’s back-end web interface for uploading your panos. The CID will allow you to find the business when searching. So in my example I would enter 107339358671766463291 and it should pull up my business/Google+ page so that I can start a work order to add the panos. Here is another part they don’t tell you. If your Google+ page or the business you are shooting for has a Google+ page but it isn’t verified or is still fairly new the CID alone won’t find your business. You have to add a hashtag in front of the CID and press enter. A link will then appear below matching #_____________________. Click on that link, it should then take you to the correct +Local page for the business then you can click “Next” and begin your upload process.
Hopefully that helps you get your panos on the right Google+ listing!
As always feel free to leave your comments below.

Hi Brian, it’s the wrong logo in the header of this post. The programm name is no longer ‘google business photos’ but ‘google maps business view’ with a new logo. cheers, Jeroen
Thanks for the comment Jeroen! You are correct, I have updated the header photo with the new name.
This page has been reported to Google as it contains non-public information.
Your CID# is public information, anyone can view it. Also there are many Google business forum posts describing exactly what I have described above… just not as organized. It is also in the documentation available free of charge from Google for photographers. Thanks!
You are sadly misinformed. It is not the CID# that is the issue, it is the screen shot of proprietary tools that you have posted.
“Another thing they fail to mention to you earlier on is that if you want to keep your Google Trusted Photographer certification you have to shoot at least one listing per month.”
The qualifications and requirements of certification are not made publicly available by Google.
I have removed those two bits of information… even though you can find the last note with a simple Google search. Have a nice weekend!
Hello, you can use this tool to find the CID https://www.show360.in/Home/Tools
This Technic did not work for me, I found easy solution here: https://www.youtube.com/watch?v=Bs50SBp5caA