
Every good marketer and blogger should be keeping an eye on their bounce rate in Google Analytics. If for some reason people are immediately leaving your site you should know why. However, the default bounce rate can be a little deceiving, and so here is a better solution that I am using, and it is called adjusted bounce rate.

Follow my tutorial below to see why and how I changed my sites to use adjusted bounce rate.
Bounce Rate
Google defines bounce rate as the percentage of single-page sessions (i.e. sessions in which the person left your site from the entrance page without interacting with the page). I’m sure you have all see this in Google Analytics before.

What does that mean exactly? Say someone hits a blog post on your site from Google. If they read your blog post and then click back to Google that is considered a bounce. Now is that really a bad thing? Maybe not. They could have read your entire blog post, got what they wanted, and simply left.
As you can see above the bounce rate on one of my sites above is 87.83%. Which at first glance, you would think it is horrible. But it doesn’t truly reflect in my opinion what you really want to know. And that is where adjusted bounce rate comes in.
Adjusted bounce rate
Adjusted bounce rate basically lets you set a timeout limit to better evaluate the quality of your traffic. You simply tweak your Google Analytics code to fire off an event after a certain period of time. Once the event is executed the visitor is no longer counted as a bounce.
You can pick the time based on what you think is a better relevant number to judge your traffic. On my sites, I use 30 seconds. If someone stays for 30 seconds or longer I no longer see them as a bounce. You could pick a longer time or shorter.
The Google Analytics team actually fully supports using adjusted bounce rate. They are the ones that originally released it back in 2012. I read marketing articles all the time but it wasn’t till earlier this year that I actually stumbled across this, otherwise, I would have been using this method for years.
Follow the steps below on how to implement adjusted bounce rate on your website. You have two different options:
Option 1
Step 1
Find your Google Analytics code. Most likely it is in your header.php file, footer.php file, the options panel for your WordPress theme, or whatever you are using to deploy Google Analytics.
Step 2
Add the following to the bottom of your code. Right above the </script>.
setTimeout("ga('send','event','adjusted bounce rate','30 seconds')",30000);
You can see I have mine set to 30,000 ms, which is 30 seconds. You can change that value to whatever timeout you prefer. Also the “adjusted bounce rate” is the label that will appear as an event that fires in Google Analytics. You can also change this to whatever you want.
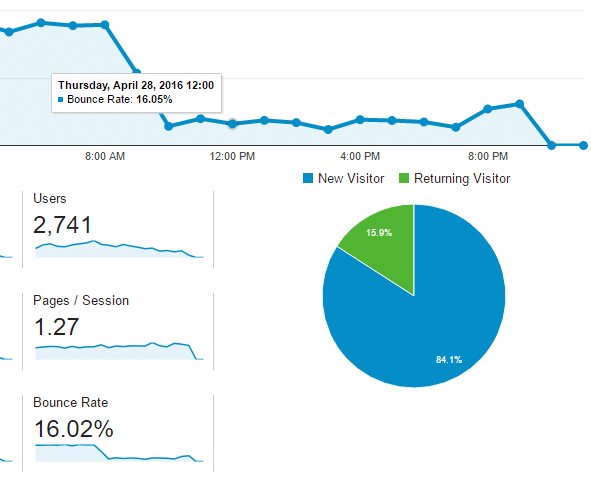
After implementing this code above you will then see your bounce rate dramatically drop. Mine averages out to around 16%-19%. As you can see this is quite different than 87%. But the data is now much more valuable to me. We aren’t trying to simply reduce the number, but better understand how our visitors are interacting with our website.
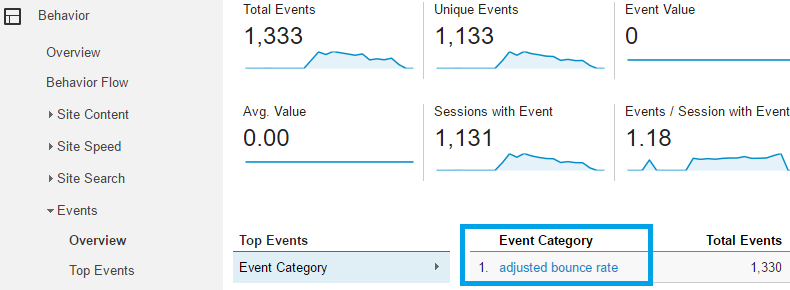
You can then also see the events that fired under “Behavior” and “Events.”
And that is it! Enjoy a new perspective on your bounce rate data. If you are looking for more ways to reduce your bounce rate I highly recommend you check out this post: 20 Ways to Reduce Bounce Rate on Your Website.
Option 2
If you’re using WordPress, your other option (the one I’m using) is to use our Perfmatters WordPress plugin. This allows you to host your Google Analytics script locally while also easily implementing the adjusted bounce rate. So it’s great for performance and marketing purposes. In the settings of the plugin, you can choose how much time you want, in seconds.

Adjusted bounce rate Google Tag Manager v2
Are you using Google Tag Manager v2 to deploy your Google Analytics script? If so I recommend checking out the following tutorials to implement adjusted bounce rate with Google Tag Manager.
- How to Install Adjusted Bounce Rate Using Google Tag Manager
- How to Use Timer Triggers in Google Tag Manager [v2]
- How to Implement Adjusted Bounce Rate (ABR) via Google Tag Manager
Was this post on how to setup adjusted bounce rate helpful? If so, please let me know below.
Thank you for this! Been wondering how to adjust. Does this also work for GTM? We are using a similar theme from same developer but when code put in the head section, we get a warning by GTM chrome extension.
Thanks in advance!
I have updated the post with some links at the end to some good tutorials on implementing adjusted bounce rate strategy with GTM. Thanks!
Great post Sam! I have added this link above. Always happy to add links that are useful and helpful to my audience. Thanks for reaching out.
Thanks for the inclusion in the post, thrilled you liked it and hope your readers find it useful! I’ll actually be adding a video update to it in the near future too. See you around Brian, keep up the great work on Woorkup, huge fan of your Wordpress posts!
What is the Google’s default time for bounce rate?
Thank you so much. I was looking for this as I don’t see any document explain about this on the plugin page.