To setup your WordPress site with Google Search Console, Bing, and Yandex, you have to first verify your site. A lot of times I see people using the META tag verification method simply because it is the simplest method. However, if you care about performance, and ensuring your site doesn’t lose its verification you really should be doing it via DNS. Follow the steps below on how to change your site over to DNS verification.
The Problem with Yoast SEO Site Verification
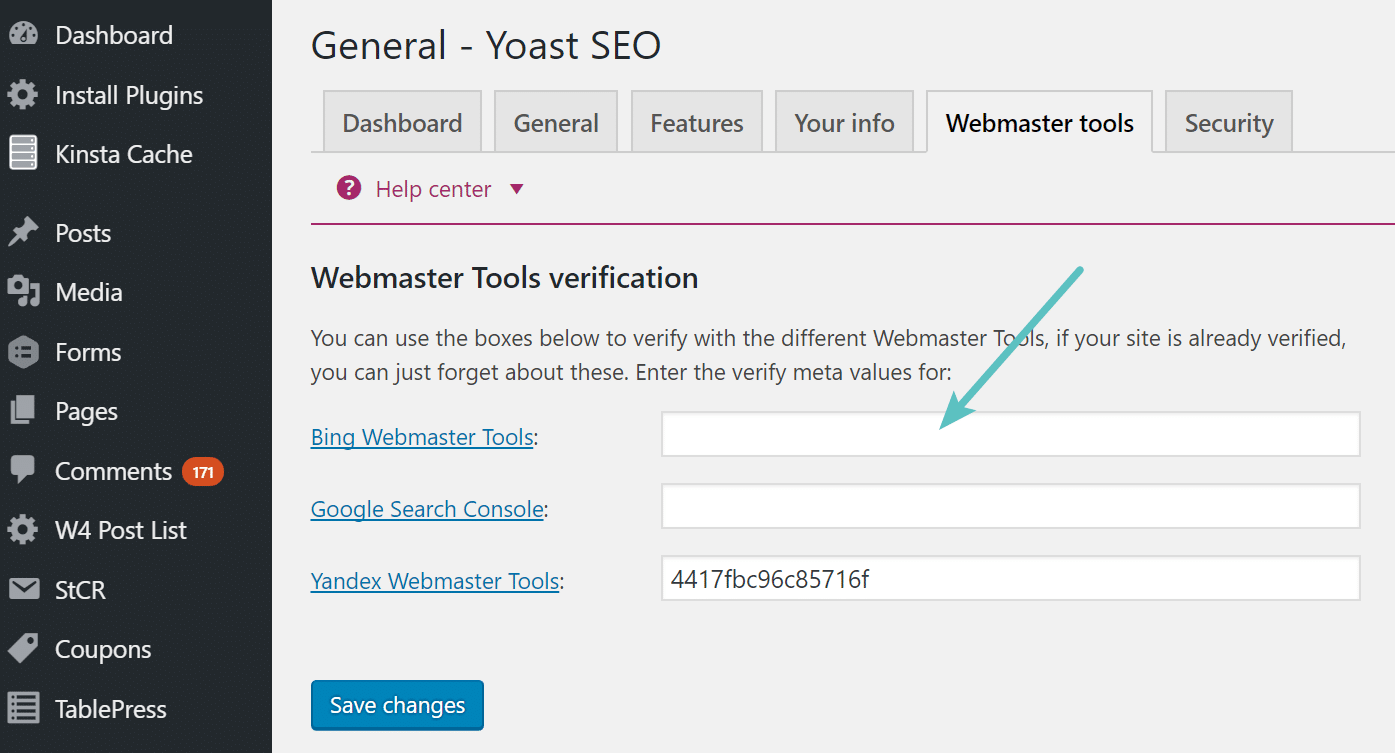
Typically when people set up their site with Google Search Console, Bing, or Yandex they will go with the easiest verification route, and that is to use the Yoast SEO webmaster’s tools section.
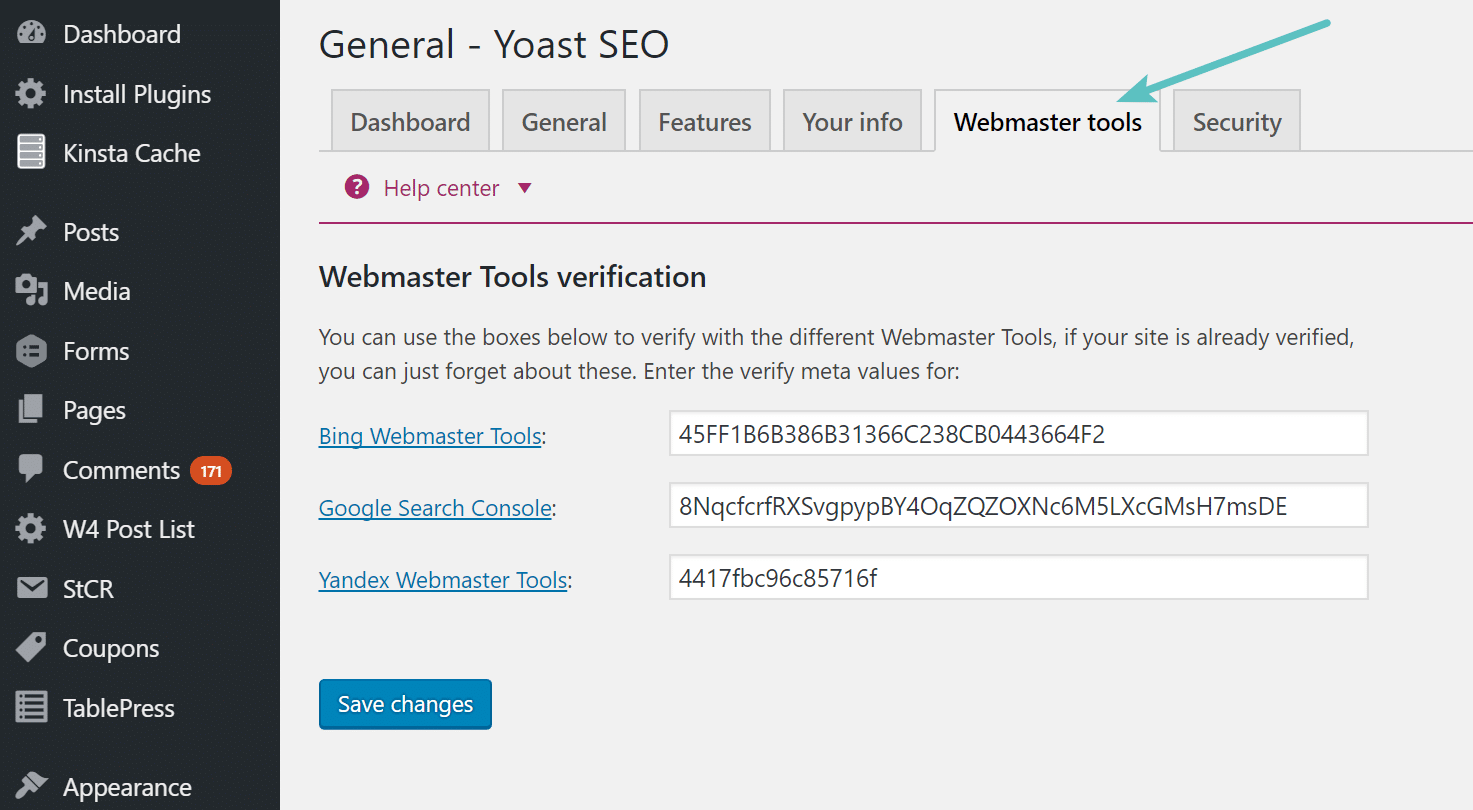
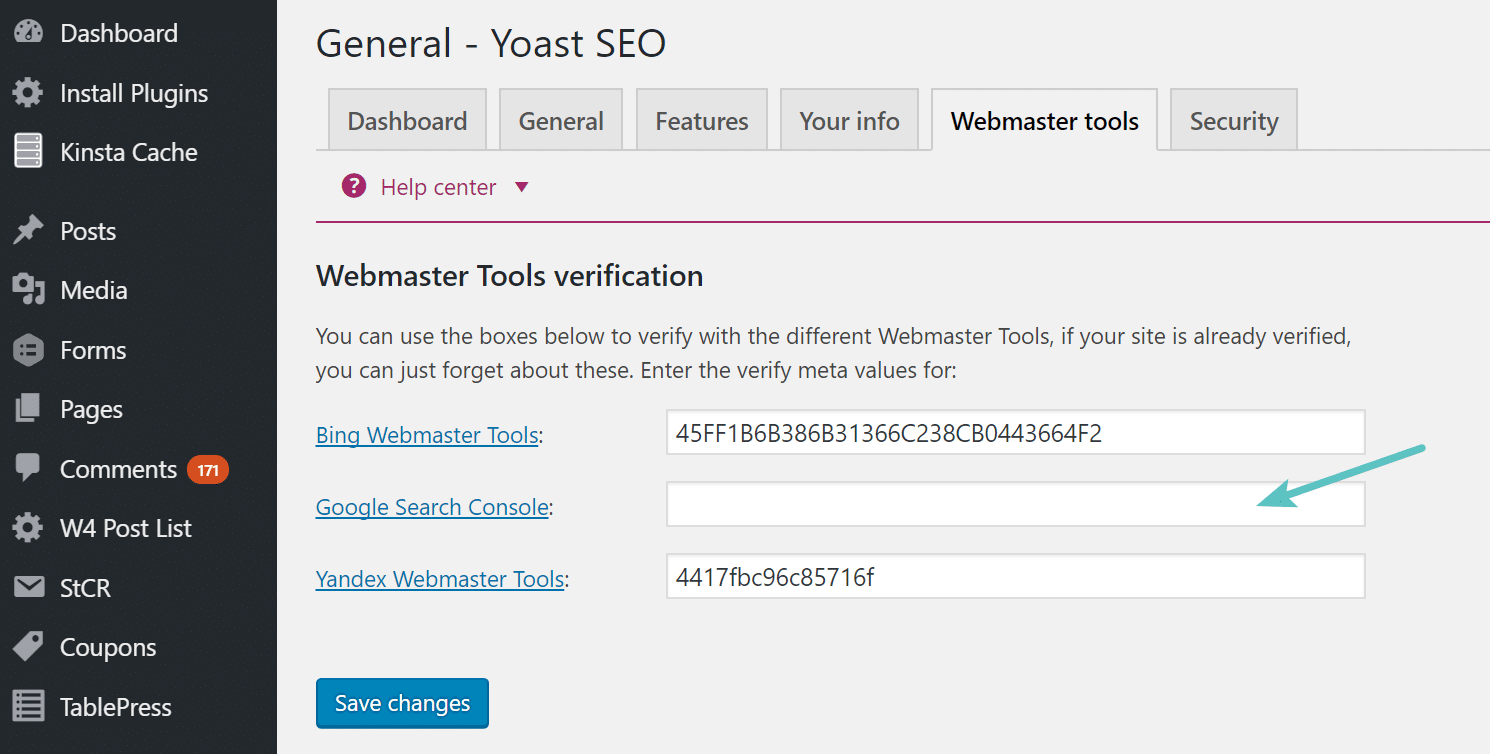
The Yoast SEO plugin allows you to easily input the verification meta tags. However, the problem with this is that this inserts the code into the header of your WordPress site. This is really unnecessary code as it is only needed once (and for periodic checks from Google Search Console, Bing, and Yandex) to confirm your site. You don’t want this code just sitting around forever, as it is a waste. And while it is only 3 lines of code, everything adds up when it comes to performance. It is good to think about these things as it will help you develop better web performance habits later down the road.

Another reason I wouldn’t recommend this method is that you have multiple administrators on your site, the odds of someone removing the tags is greater than if you are using DNS records, as most likely only one person has access to those. Also, other things could happen, such as you change SEO plugins and you forgot to re-verify.
So today I will walk you through to migrate your WordPress site over to DNS verification instead. Remember, these tools do check periodically for these, that is one reason why you simply can’t remove it altogether. However, the DNS option allows you to verify your site with no code overhead and it will work for future checks.
DNS Verification with Google Search Console
If you have already verified your site with the Yoast SEO plugin, the first thing to do is change it over to DNS verification. If you have never verified your site before, skip down to Step 3.
Step 1
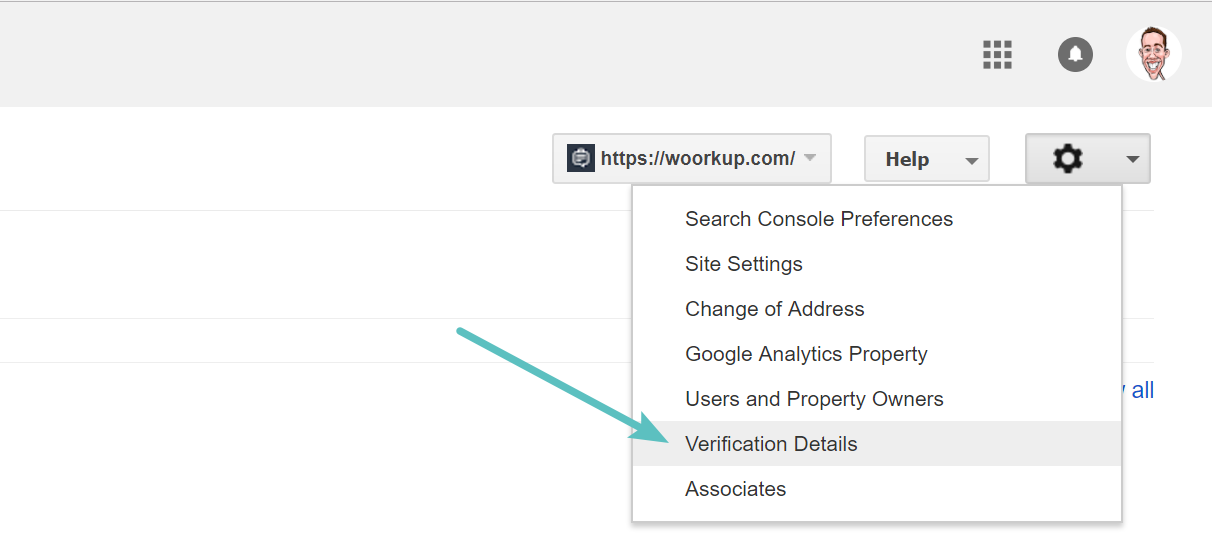
Head over to Google Search Console and click on your site. On the right hand side, click on the “gear” and then on “Verification Details.”
Step 2
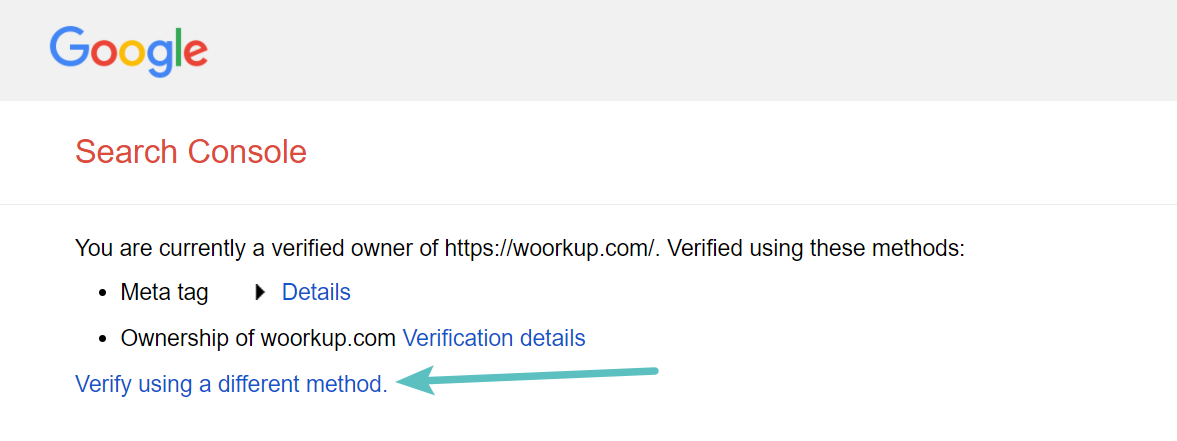
Click on “Verify using a different method.”
Step 3
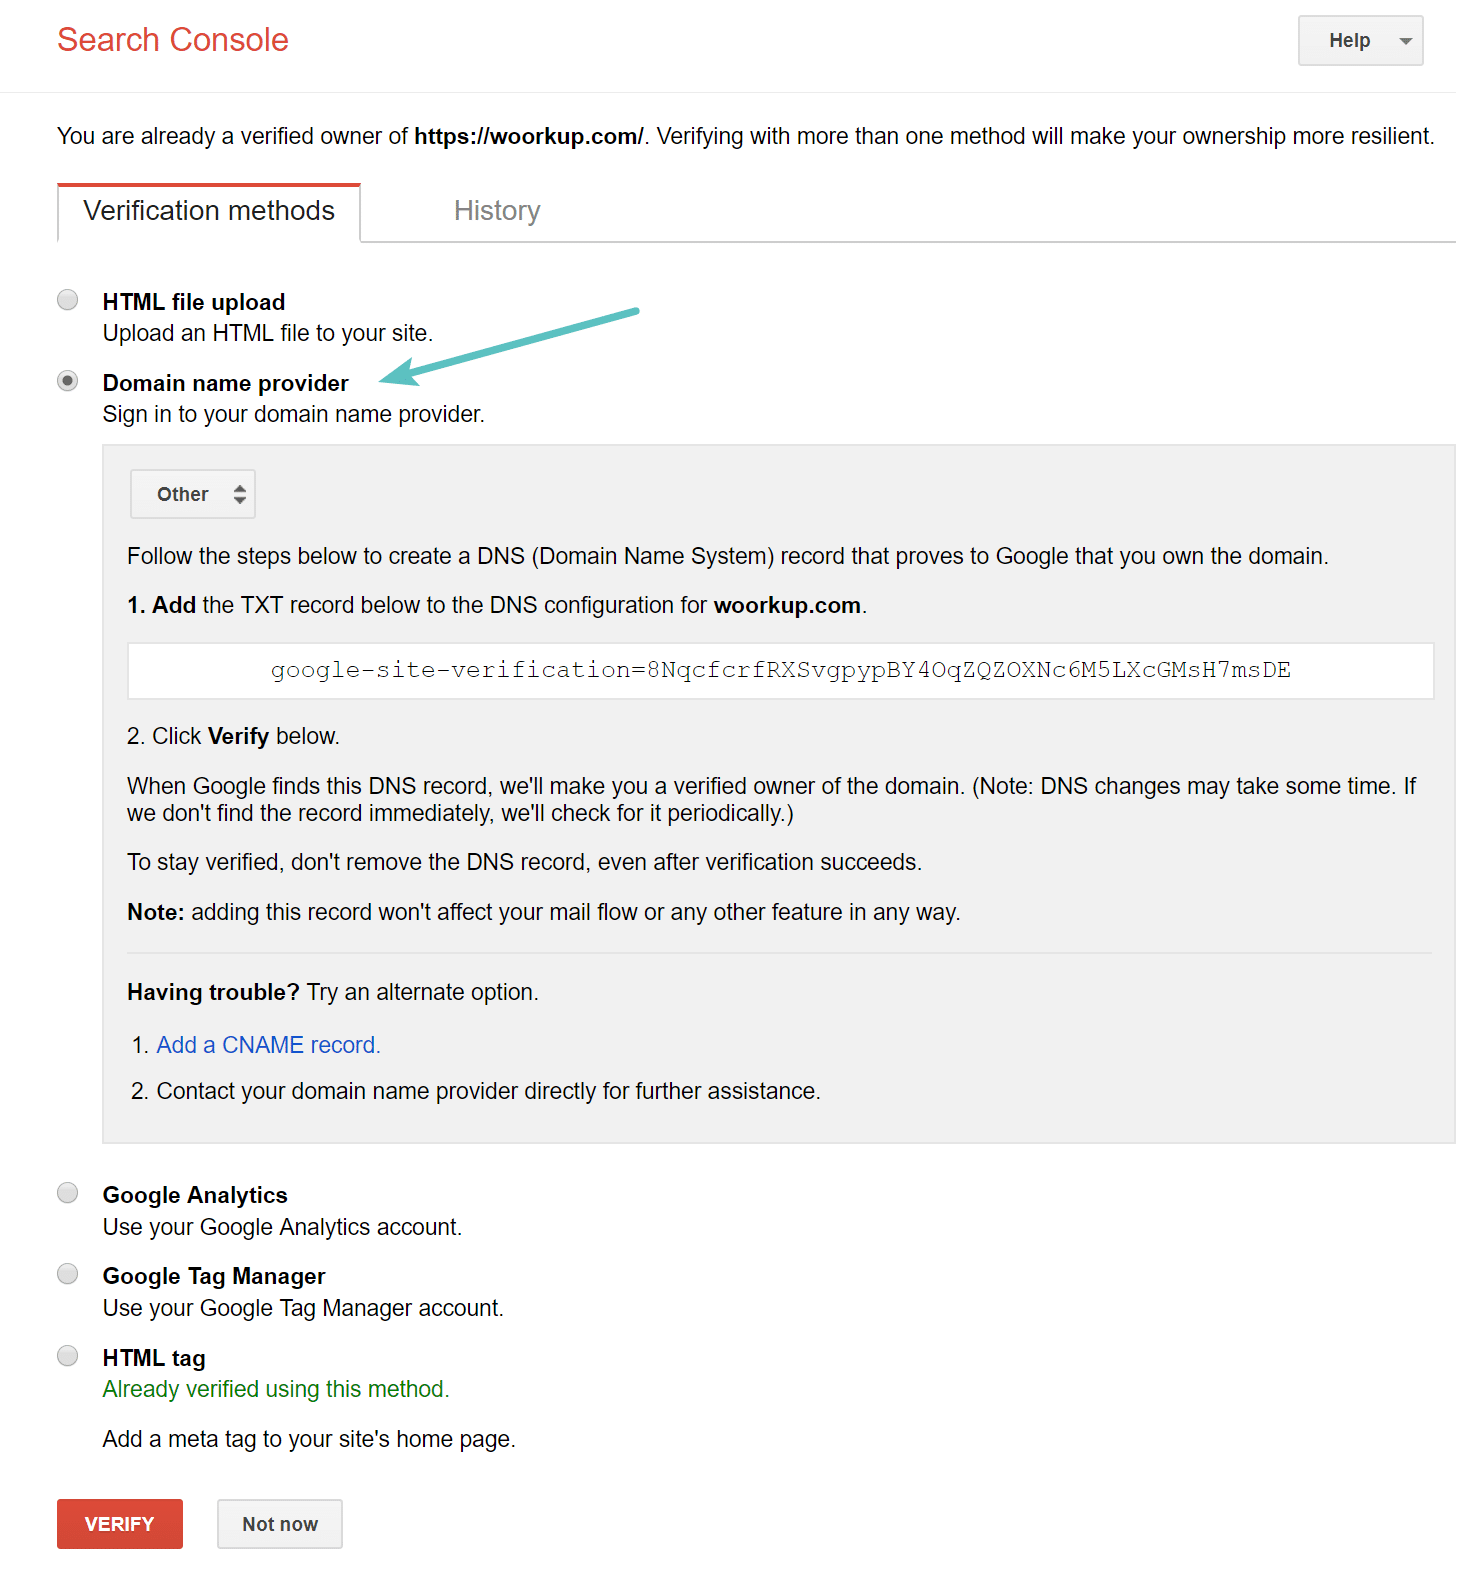
Then from the verification methods choose “Domain name provider.” If you don’t see your DNS and or domain registrar listed, choose “Other.” I am using DNS Made Easy on all of my sites because it is faster, so I choose other.
Note: You could also use the Google Tag Manager or Google Analytics verification without additional code if they are already running on your site.
Step 4
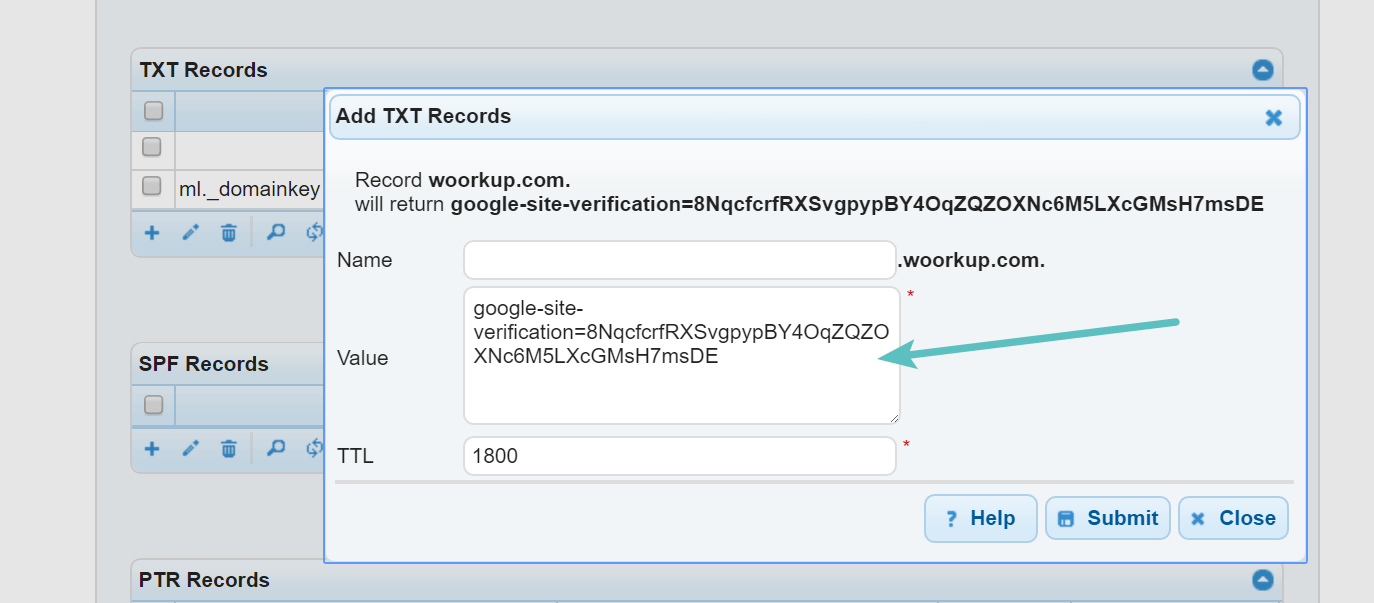
Login to your domain registrar or DNS provider. These steps might vary slightly based on the provider, but they will be very similiar. If you need help, you can always ask the provider to add the information above for you. So in DNS Made Easy I enter in the TXT record value that Google provided. And then hit submit.
Step 5
Then back on the Google verification screen click on “Verify Now.”

Step 6
Then make sure to remove the code from the Yoast SEO plugin, as this will remove the code from your WordPress site’s header. Your site will now forever be verified using DNS and you don’t have to worry about someone removing the code and it won’t have any overhead on your site.
DNS Verification with Bing Webmaster Tools
Now it’s time to do the same thing with Bing Webmaster Tools.
Step 1
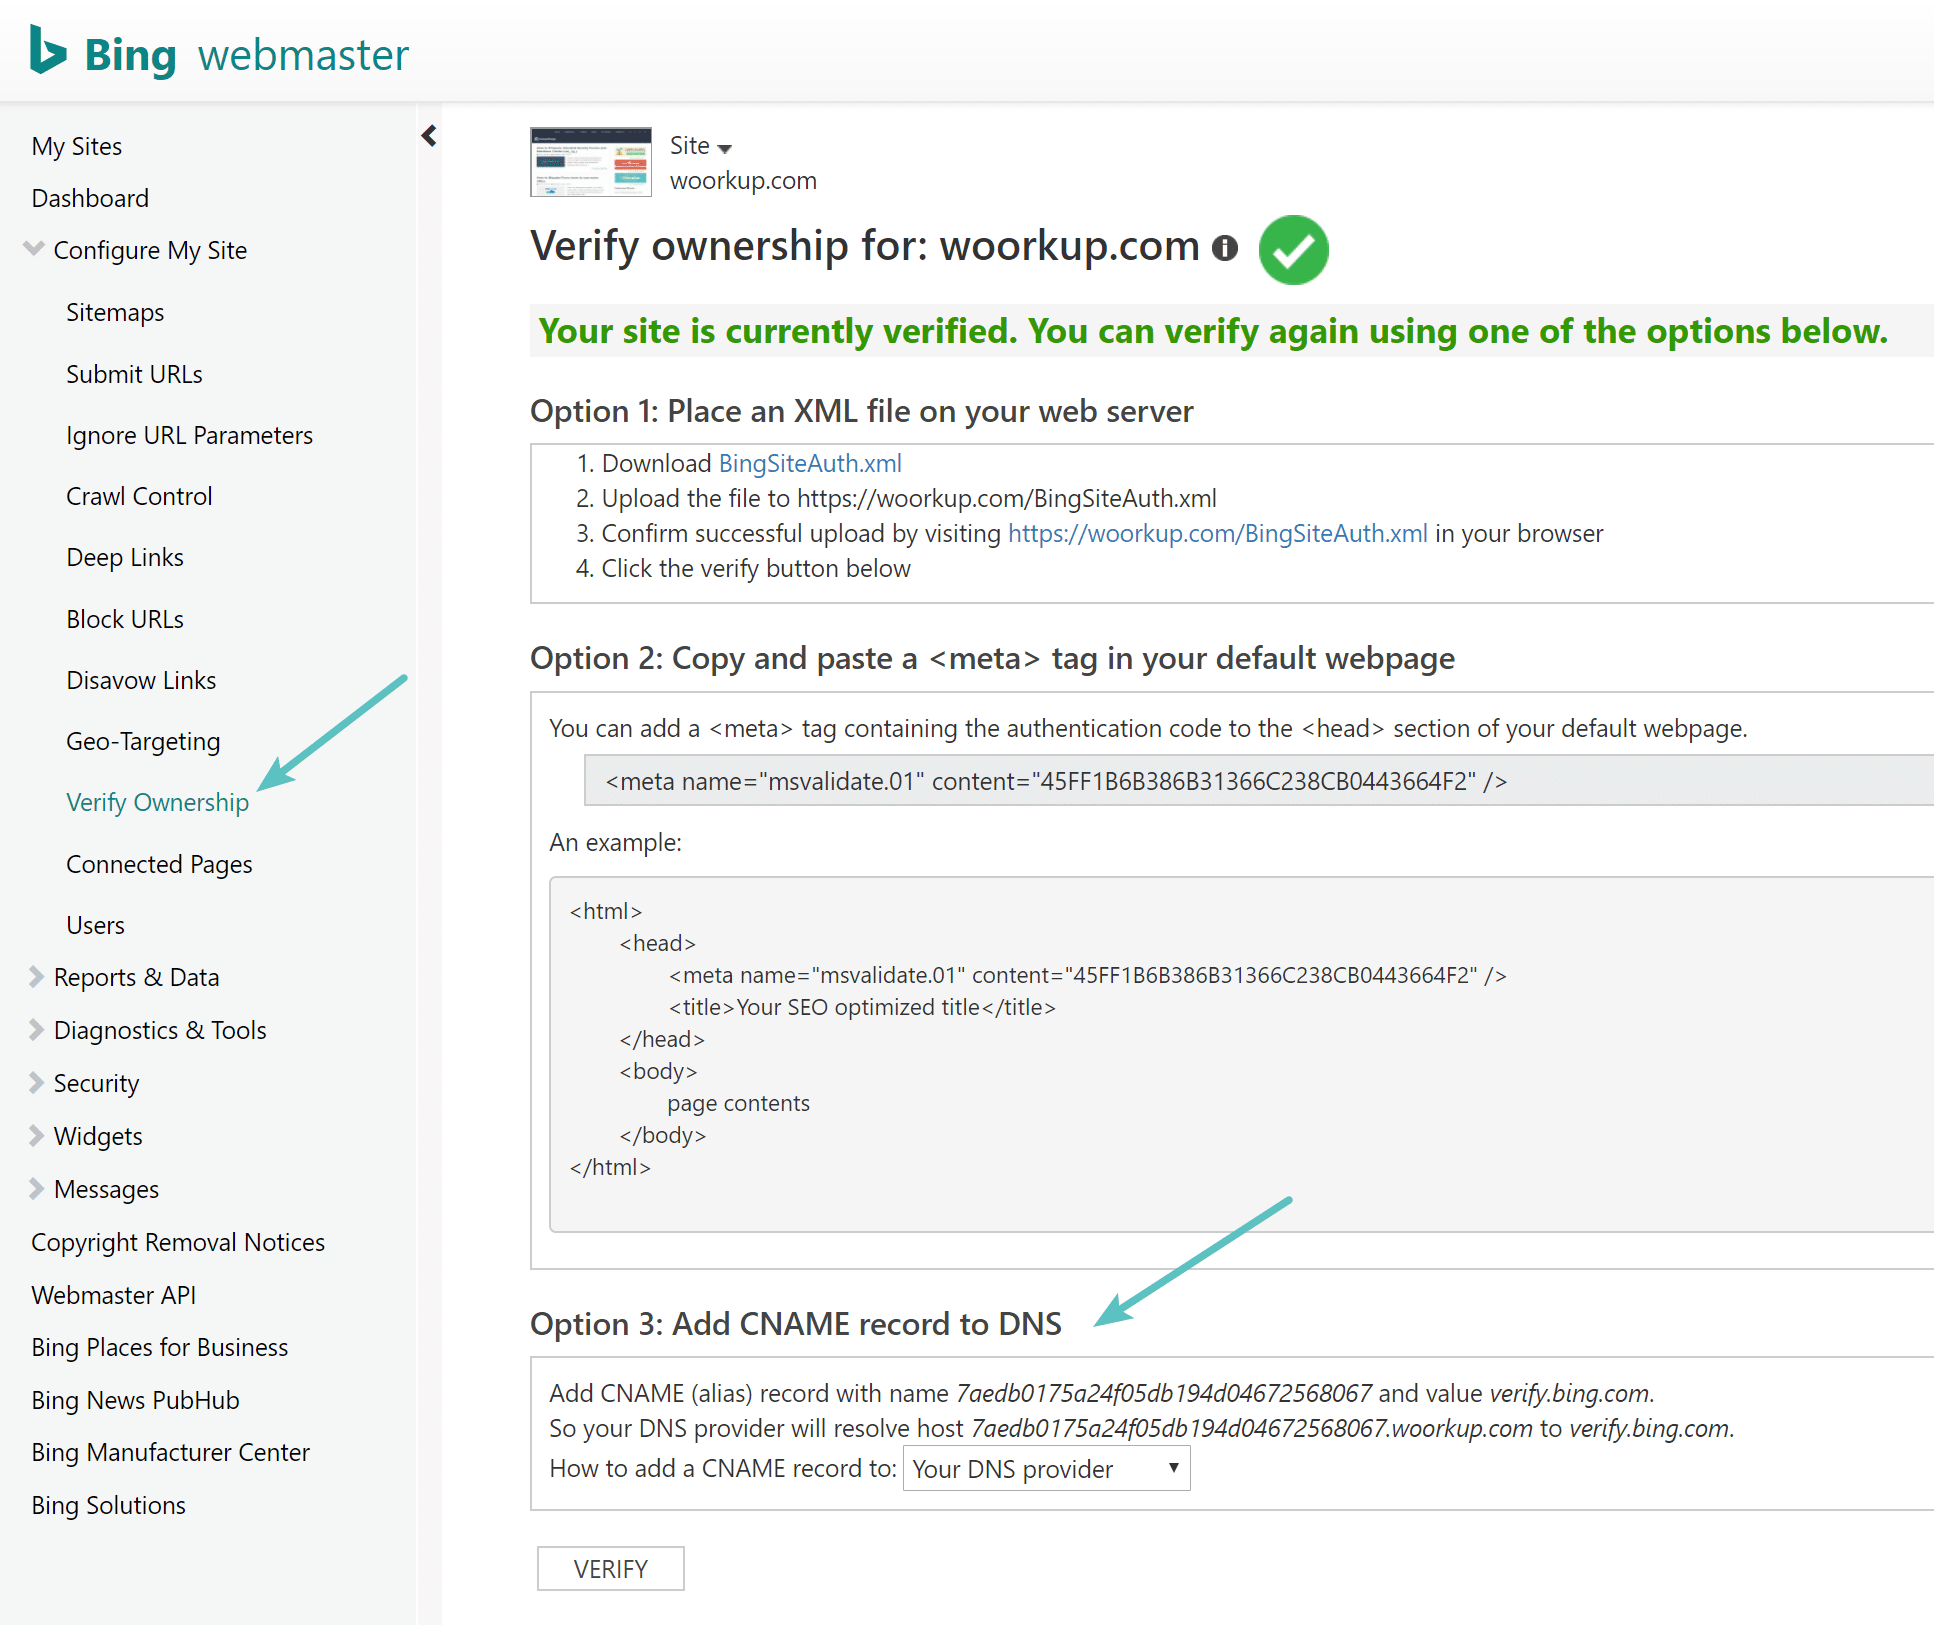
Head over to Bing Webmaster Tools and click on your site. On the left hand side, click on “Verify Ownership.” Bing actually requires you to add a CNAME records with your DNS provider or domain registrar.
Step 2
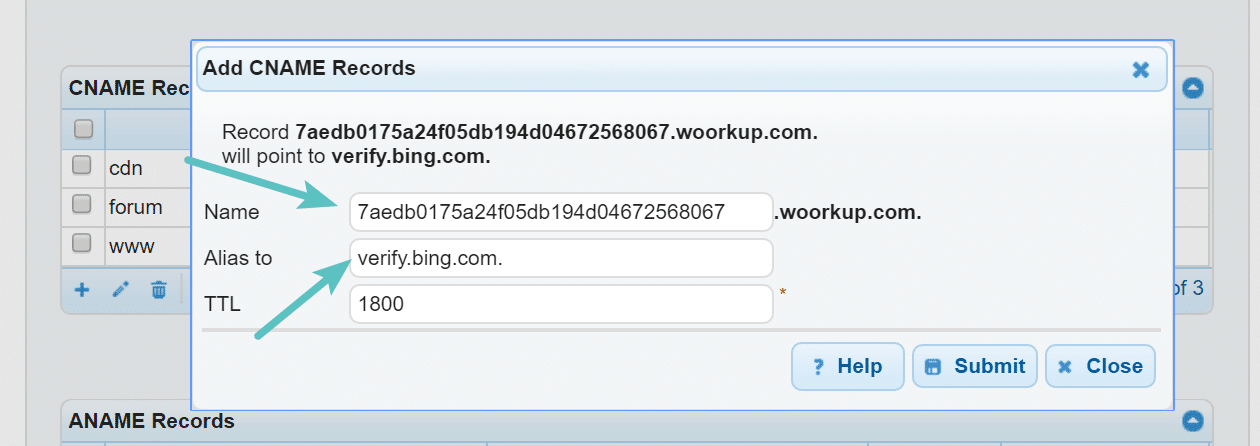
Login to your domain registrar or DNS provider. So in DNS Made Easy I enter in the CNAME record value and what it resolves to. And then hit submit.
Step 3
Then back on the Bing verification screen click on “Verify.”
Step 4
Then make sure to remove the code from the Yoast SEO plugin, as this will remove the code from your WordPress site’s header. Your site will now forever be verified using DNS and you don’t have to worry about someone removing the code and it won’t have any overhead on your site.
DNS Verification with Yandex Webmaster Tools
Now it’s time to do the same thing with Yandex Webmaster Tools.
Step 1
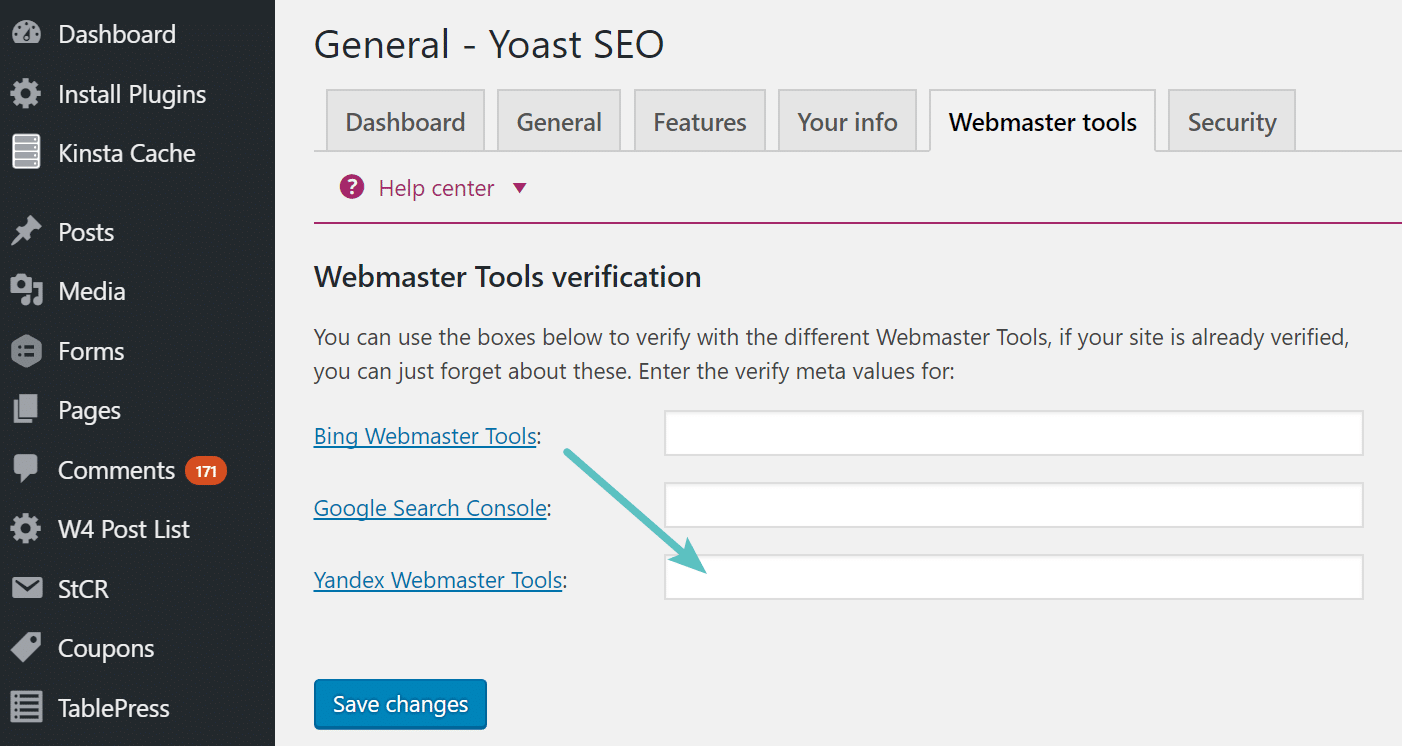
Unfortunately there doesn’t appear to be a way to change the verification once it is done. So the best way to change it would be to remove it from Yoast SEO and check back in a month as it will most likely show as unverified. Then you can verify using the DNS method as seen in step 2 below.
Step 2
Head over to Yandex Webmaster Tools and click on “verify your site management rights.”

Step 3
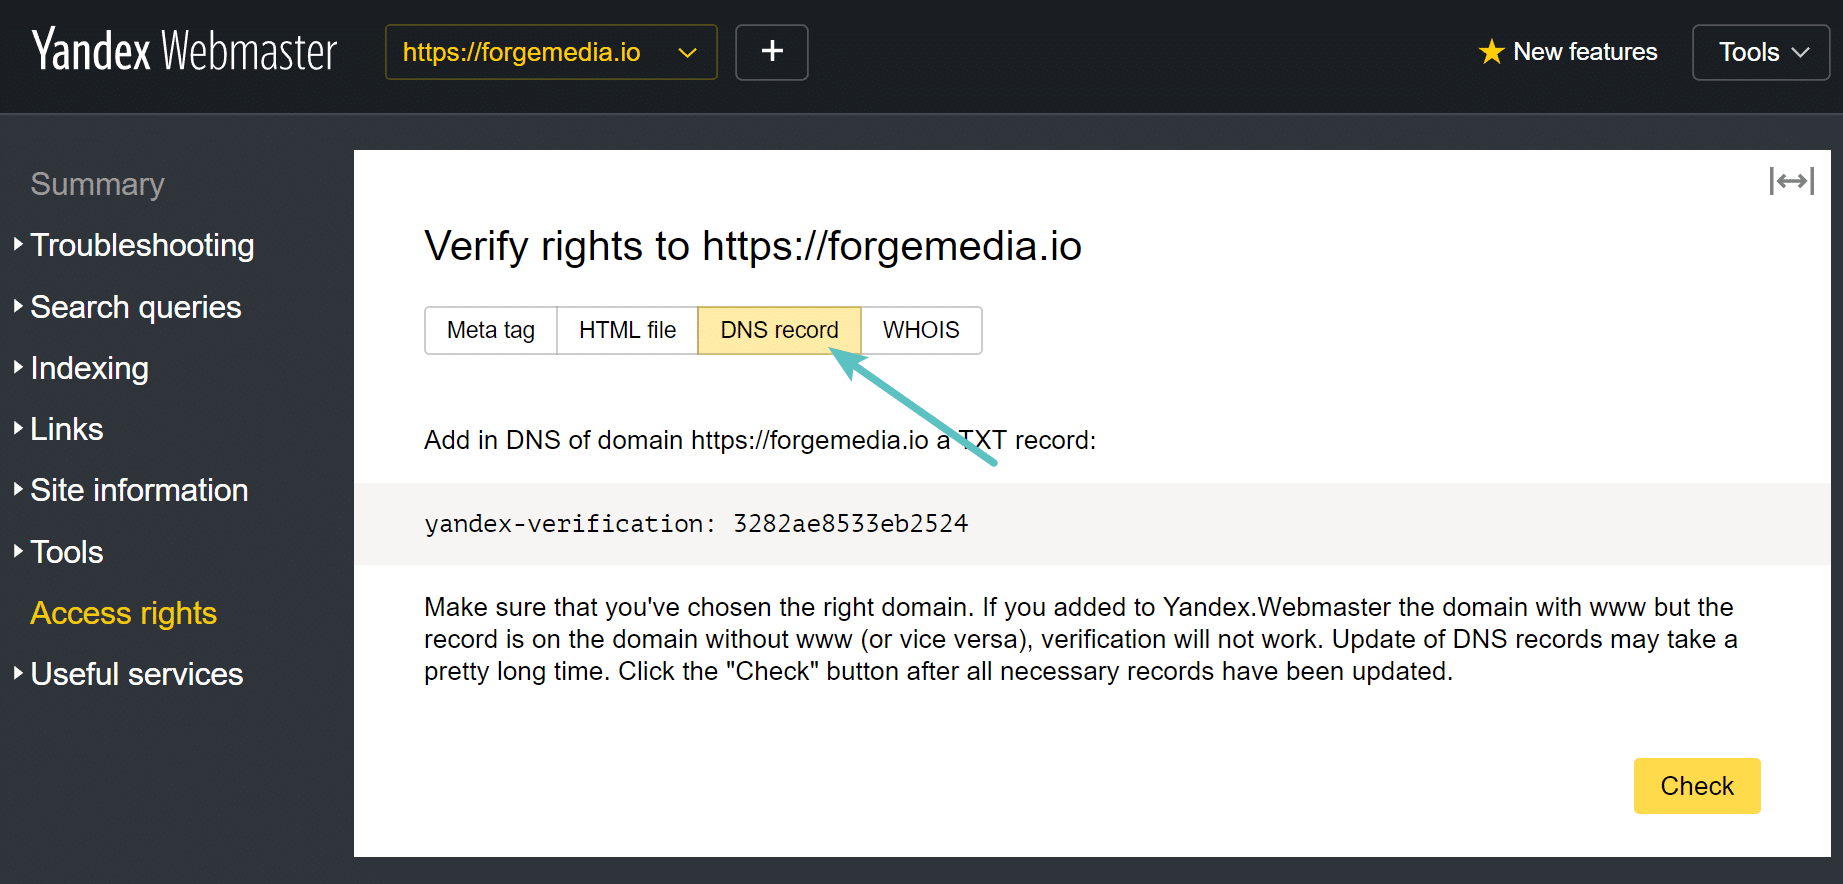
Under “Verify rights” click on the DNS record tab. Just like with Google Search Console, Yandex requires that you add a TXT record.
Step 4
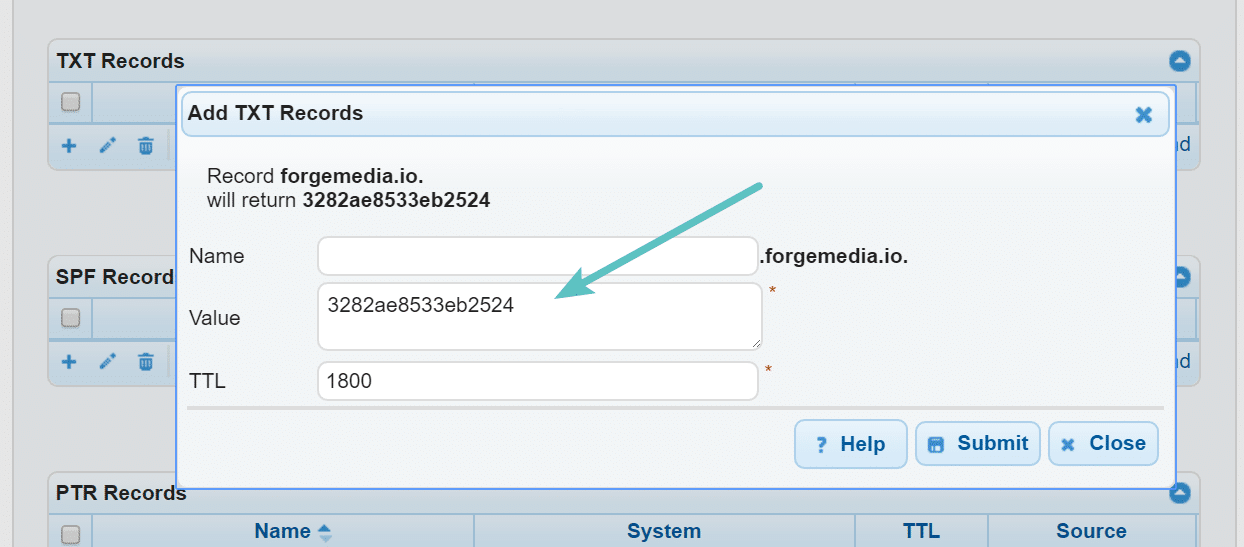
Login to your domain registrar or DNS provider. So in DNS Made Easy I enter in the TXT record value. And then hit submit.
Step 5
Then back on the Yandex verification screen click on “Check.” It takes up to two days to verify your site.
Summary
And that’s it. You now know why and how to use DNS verification for your WordPress sites. Less code on your sites is always a good thing! And you decrease the chance of losing verification as the odds of someone or you accidentally removing a DNS record is far less than removing the meta tag in your Yoast SEO plugin.
I’m curious, how are you verifying your sites? Let me know below in the comments.

Done. :)
Indeed great tips from you as always.
Thanks Gulshan! Every little bit helps :)
I rather enjoy DNS verification with Bing Webmaster tool. You have used one line that less code on your site is always a good thing and I completely agree what you have written. Thanks for these short tips. Great post indeed.
feeling lazy can’t do it :p
Haha. You and the rest of the WordPress community :) kidding…
I really never bothered to check other verification methods on webmaster. Great to know this method. Going to implement right now.
Thanks for the tip Brian.
Interesting. Do you know if the Google Analytics verification method also adds a line of code?
Oh hey Benjamin! So I just added a note to the post above. If you have either Google Analytics or Google Tag Manager running you could use them. I sync Google Analytics locally for performance reasons and therefore my GA verification always fails lol.
You’re trying to solve an issue that doesn’t exist
Unnecessary code on your site is an issue if you care about performance. Also, if your client removes the code it can become unverified. Doing it via DNS is faster and safer.
Great, I am new in this. But now at least i have verified my site for search engine. Thanks to you :)