
You should always be optimizing your Google AdWords campaigns and so I thought I would put together this list of easy optimizations you can apply. I spend probably a good 60% of every day in AdWords and I have learned a few tricks along the way. If you follow this entire list you will definitely be on the right track to crush your competitors.

Now to get down to business! Some of these might not be applicable for you, but I wanted to be thorough. Also remember with AdWords, always based your decisions off of your own data, not just because I tell you. What works in some scenarios might not work well in others.
AdWords Optimizations List
- Tip 1 – Excluding mobile app traffic
- Tip 2 – Increase CTR on GDN by disabling below the fold placements
- Tip 3 – Capitalizing on your highest performing keywords
- Tip 4 – Always run accelerated delivery method when possible
- Tip 5 – Save some of your budget by implementing ad schedules
- Tip 6 – Negative keywords are your friend
- Tip 7 – Use targeted locations + do your research
- Tip 8 – Take advantage of the new opportunities section
- Tip 9 – Save budget by blocking your companies IP address
- Tip 10 – Excluding categories on your GDN campaigns
- Tip 11 – Link your AdWords account with Google Analytics
- Tip 12 – Changing your Billing Threshold
- Tip 13 – Easy filters for tiered bidding approach
- Tip 14 – Add Sitelink Extensions
- Tip 15 – Add Location Extensions
- Tip 16 – Add Call Extensions
- Tip 17 – Add Review Extensions
- Tip 18 – Add Callout Extensions
- Tip 19 – Increase Your Quality Scores with Tenscores
- Tip 20 – Split Test Your Ads
- Tip 21 – Change Device Bid Adjustments
- Tip 22 – Change Location Bid Adjustments
- Tip 23 – Use Radius Location Targeting
- Tip 24 – Location Target and Exclusion Options
- Tip 25 – Targeting Multiple Languages
- Tip 26 – Setting your Bid Strategy
- Tip 27 – Changing Your Ad Rotation
Tip 1 – Excluding Mobile App Traffic
When was the last time you took a look at your display network traffic placements? If you don’t remember, well that means it has been too long. A lot of your budget might be being wasted on clicks from kids playing mobile games on their iPhones. I see this happen all the time. Follow the instructions below on how to disable mobile app traffic completely.
Step 1
The first step is to browse to your Shared Library. This makes it easier to add the exclusion later on to all of your campaigns. Or you can simply do it via AdWords Editor.

Step 2
Then click into “View” under Campaign placement exclusions.

Step 3
Click on the “+ List” to add a new exclusion list.

Step 4
Then select a name for your list. In my example I named it “Mobile Apps”, and then enter the following in the placements box: adsenseformobileapps.com

Step 5
Now we have created the exclusion list, we need to add it to your Display Network Campaign. So while on the placements screen from earlier, scroll down to the very bottom and click the “+ Exclusions.”

Step 6
Select “Placements” from the Add campaign exclusions drop down.

Step 7
Now add the name of your exclusion list and hit close.

You have now excluded mobile app traffic within your AdWords campaign. Don’t forget to add the exclusion list to your other display network campaigns.
Tip 2 – Increase CTR on GDN by Disabling Below the Fold Placements
We all know the click-through rate (CTR) and conversion rate on the Google Display Network (GDN) is always a lot lower than the search network traffic. However, there are many things you can do to increase the CTR and quality of clicks. Below we will be going over how to disable below the fold ad placements for your display network ads. As always run tests to see how they perform afterwards. You might notice that your amount of clicks goes down significantly due to only high quality ads showing in the above fold placements.
Step 1
Click into your display network campaign in Google AdWords.

Step 2
Scroll down to the very bottom and click on the “+ Options” button.

Step 3
Then select “Excluded” on the Below-the-fold option.

Step 4
Press “Save” and you are good to go. Monitor the results and change accordingly. I have seen this many times increase the CTR on ads.
Tip 3 – Capitalizing on Your Highest Performing Keywords
If you already have a campaign or set of adgroups that are converting well, why not spend more of your budget on those? I see so many small businesses just running the same keywords/campaigns week after week and there first question is how can they do better? They usually have the answer sitting right in front of them. If keywords haven’t had any conversions, don’t be afraid to pause them. Don’t be afraid to change things, otherwise you will never see big improvements! Right now, go look at your top 15 converting keywords, and this next week, bid higher on them. Or even create a new adgroup with your top performing keywords.
A quick and easy way that I like to do this is to sort my keywords by 6 months or more of data and then prioritize my bids on those converting well at a good cost / conversion. Follow the steps below for an example.
Step 1
Click into your best converting campaign and click into the “Keywords” tab.

Step 2
Sort the filter by 6 or more months worth of data.

Step 3
Sort by converted clicks or conversions. If you are happy with the cost / conversion these are the keywords you should be prioritizing your budget around. Make sure your average position is at least on the first page. If not, you probably need to bid a little higher on those keywords. Then look at keywords with no conversions for the past 6 months that are wasting money. If they aren’t converting, don’t dwell on them. Most of the time people have all the converting keywords they need, they simply need to weed out the wasted spend.

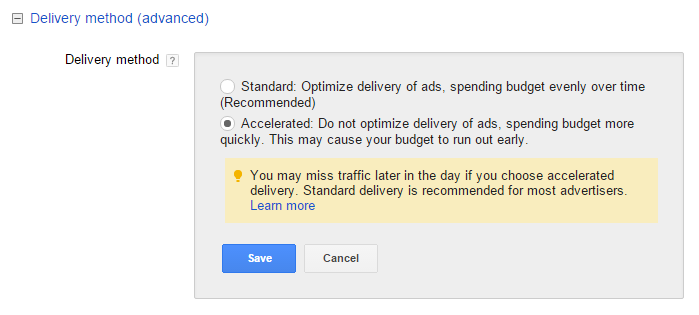
Tip 4 – Always Run Accelerated Delivery Method When Possible
If you are in your adwords accounts daily or someone is at least touching them daily, run your campaigns on the accelerated delivery method. Letting Google decide when to show your ads is putting a lot of trust in them with your money and it could be hurting you. When you run accelerated it means your ads will always be showing until your daily budget has been reached. You might have to tweak your budgets and bids to allow them to run all day, but I guarantee you will get a much better return.
Andrew Lolk wrote a good little piece on the mistakes of using standard delivery method without a strategy behind it.
Tip 5 – Save Some of Your Budget By Implementing Ad Schedules
The decision to implement ad schedules is not to be taken lightly. I would suggest possibly doing it on one campaign/ad group at a time to test how it performs. Depending on your niche it, or what you might be selling, it doesn’t always make sense to run ads in the evenings. Ask yourself, do you get a lot of conversion in the evenings? Do you even answer the phones in the evening? There is still something to be said for building your brand. And perhaps someone searches for you in the evening but doesn’t call you till the next day? How many people are in that boat? You could also setup a lower bid adjustment for the evenings if you aren’t ready to turn them off all together.
Step 1
First you need to find out when your conversions are happening. To do this click into your Dimensions tab.

Step 2
There are two reports you will want to look at. Both the “Day of the week” report and the “Hour of day” report.

Step 3
Then click into “Settings” and then “Ad Schedule.”

Step 4
Then add schedules based off the data you got in step 2 and perform bid adjustments accordingly. Or even turn ads off certain days.

Tip 6 – Negative Keywords Are Your Friend
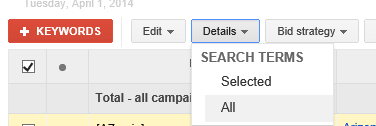
When was the last time you looked at search terms report on your keywords? You should always be looking at these reports to see what is actually triggering your ads. Especially if you are running a lot of broad match keywords. You should be adding negative keywords on a weekly basis if possible. At least once a month. Doing so will save you over time from wasting money on irrelevant searches that will never convert. And the nice thing is that the more and more you ad, the more fine tuned your campaigns will become. The more money you save, means the more keywords you can bid on, or that you can raise your daily budgets.
Go right now into your keywords tab, click on the “details” button and go into “All” under search terms to see all the incoming search terms triggering your ads.
Tip 7 – Use Targeted Locations + Do Your Research
Unless your targeting the entire country you should always use the targeted locations section. I am a big fan of radius targeting. Overlapping is ok and you should do that so you have multiple radius’s and you can bid higher on those that are closer to your locations. See my example below… I have targets within other targets… but my bid adjustment is higher on those within a closer distance to a location. If you offer a service or product in a physical location, most likely you will want to bid higher on those within a 5-10 mile radius, and the further out you go, the less you probably want to spend as they are less likely to make the trip. Also be smart about your targeting. Maybe look-up the annual household incomes in areas your targeting and use that to know and find where you should be spending your money.

Tip 8 – Take Advantage of the New Opportunities Section
The newly redesigned opportunity section in Google AdWords keeps getting better. And while I don’t advise to blindly do whatever it says, it can give you great insight on new ideas, and there will always be things you will find that you haven’t thought of. Use this as free advice and a great guide.

Tip 9 – Save budget by blocking your companies IP address
Looking for another way to save some money on your PPC budget? Have you ever checked to see how many people within your own company are clicking on your ads? You might be surprised. A lot of people, even trying to access their own companies website, don’t even bother typing in the domain URL, they go to Google, search for it and click on the first thing they see… which is probably your branding ad. Follow the steps below to check how much internal traffic is hitting your site as well as how to block your ads from showing within your companies network.
How Can I Find My Companies External IP Address?
There are a lot of websites that can lookup what your IP is. I suggest using http://whatismyip.com/. You will see your IP at the top. (example below) Depending upon how your network is setup, this might not be the only IP you want to block or check. I would suggest checking with your IT department to see if there are any other IPs used.

How Can I Track IPs that are Hitting my Website?
Unfortunately you can’t see IPs in Google Analytics. So for this, I turn to a service called Clicky.
They have a free plan up to 3,000 pageviews per day. If you exceed that their paid plans are very reasonable for all the data you get.
Once you have Clicky installed and running on your site for a while (I recommend at least a week or so), click into the “Visitors” section. You will see a list of people who have hit your site and their IP addresses.

You can then filter it further by clicking into Traffic Sources and selecting “Advertising…” You can then look to see if any of your companies IPs are showing up. If so, then you probably have some of your budget being wasted on clicks that will never convert.

How Can I Block My Companies IP from Showing My PPC Ads?
To keep your ads from showing you will need to add an IP Exclusion in Google Adwords. You have to do this within each campaign. Follow the steps below.
Step 1
In Google Adwords click into your campaign and click into the settings tab.

Step 2
Scroll down towards the bottom, expand the IP Exclusions section and click on “Edit.”

Step 3
Add the IP(s) you gathered in the beginning of this post. Click “Save” and you are good to go. Your ads will no longer show on that IP address.

We would love to hear your opinions below. You can also use this technique to hide ads from your competitors, if you can manage to look-up their IP.
Tip 10 – Excluding categories on your GDN campaigns
If you are running Google Display Network (GDN) campaigns you should be excluding certain categories, otherwise it is money down the tubes. A lot of people seem to miss this easy setting. GDN campaigns can be tricky and usually always convert less than search campaigns. Follow the instructions below to exclude categories on your GDN campaigns and make every penny count.
Step 1
Click into your GDN campaign. You can see below one of my GDN campaigns is a branding one. If you aren’t bidding on your own brand name you really should be. Read this article from WordStream on Five Reasons to Bid on Branded Terms in PPC. This applies to your search campaigns as well.

Step 2
Click into the “Display Network” tab.

Step 3
Scroll down to the very bottom and click on the “+ Options” button under site category options.

Step 4
You will then see a list of categories in which your GDN ads will show on. By default “Gambling” is the only one excluded. However, I highly recommend excluding Parked Domains, Errors Pages, and In-game. The In-game won’t usually convert at all for businesses. Unless you are advertising gaming products then you might want to leave this one on. Error pages and parked domains tend to have an incredibly high bounce rate and people usually tend to click away almost instantly upon seeing these. Depending on the nature of your business you might be able to exclude more as well. I have another post about using the ad location: Increase CTR on Display Network by Disabling Below the Fold Placements. After excluding these press “Save.”

Your exclusions will then appear at the bottom. Since gambling is excluded by default it will never show here.

That’s it! Go through all your GDN campaigns and exclude these categories. You should now be able to squeeze a little more out of your current budget!
Tip 11 – Link your AdWords account with Google Analytics
It’s always good to go back to the basics sometimes. The readers of this blog range from beginners to advanced marketers. One thing that all of us sometimes forget when launching a new PPC campaign (account) is to link the Google AdWords account with Google Analytics. So I am going to show you how! Make sure to bookmark this page and add it to your workflow.
Why Should You Link Your AdWords Account with Analytics?
The simple answer is that this will help you track additional data and conversions. If you don’t think tracking conversions are important, well… I can’t help you. Conversion tracking should always be your #1 priority when it comes to any type of online paid advertising. If you don’t track what is converting then how will you know what is working? Not just that, you won’t be able to track your ROI either. Linking AdWords with Analytics gives us the ability to track goals and other information from your Analytics account; such as Bounce Rate and Pageviews/Visit.
Step 1
First we are going to go into your Google Analytics account.

Step 2
On the left hand side under Account we are going to click into “Account Settings.”

Step 3
We need to check “With other Google products only.” This will allow Google Analytics and Adwords to share data. Then click on Save.

Step 4
Now go back a page and under the property (middle column) we are going to click into “AdWords Linking.”

Step 5
Click on “New Link Group.”

Step 6
You will then be presented with a list of AdWords accounts. This is assuming you are logged in using the same gmail address you use with AdWords. Click on the AdWords account you are wanting to link and click “Continue.”

Step 7
Next under link configuration you will want to click on “Linked views(s)” and then select your view and then press Save.

We are now done with the Google Analytics side, so we will now proceed to the Google AdWords side.
Step 8
In your Google AdWords account click the little gear in the top right and click into “Account Settings.”

Step 9
Next expand the “Linked Accounts” on the left hand side and click into “Google Analytics.”

Step 10
Now you should have views available. Expand them and select the domain your are setting up. There will be small “Add” button which you will have to click. Then press Save.

Seeing Google Analytics Data Columns
Now that you have your accounts linked there are four new columns you can add.
- Bounce Rate
- Pages /visit
- Avg. visit duration (seconds)
- % new visits
In your campaigns you click on “Columns,” “Customize columns,” and then “Google Analytics.” You can then choose to add any of the four new columns.

Importing Google Analytics Goals
There are two types of conversions you can track in AdWords. The built in conversions and also the goals that you setup in Google Analytics. Now that your accounts are linked you can now automatically import these goals. To do this click on “Tools” and then “Conversions.”

Then if you have not already imported them there will be a button titled “Import from Google Analytics. (mine is greyed out because I have already imported them)”

Now you can track the built in AdWords conversions and your Google Analytics Goals. This should help you make better and smarter choices within your campaigns. Having all the data is the key to your success.
Tip 12 – Changing your Billing Threshold
In Google Adwords when you setup automatic payments you are billed when you reach the billing threshold. The billing threshold works in tiers and keeps raising until you hit $500 in spend.
Billing Tiers
- $50
- $200
- $350
- $500
Once you hit $500 in spend you will automatically be billed every time you reach $500 from that point on. Some of us have bigger accounts than others. If you end up managing multiple accounts with big budgets and are dealing with billing issues or an accountant sometimes it can get a little confusing. First of all the billing export from AdWords isn’t the greatest and if you are spending $10,000 or $20,000+ a month then this creates a lot of $500 entries/charges.
[alert-note]For example, if you spend $20,000 in AdWords one month you are going to be charged 40 times.[/alert-note]That is a little ridiculous. So here are instructions on how to increase your billing threshold in Google Adwords beyond the $500 default limit.
Step 1
Check your current monthly spend in the account you are wanting to raise the threshold. To be eligible to raise it you must be spending more than $3,000 a month. (beyond that the threshold will be determined based on historical monthly spend)
Step 2
If you meet the eligibility requirement above then call Google Support at 1-866-246-6453. The Google AdWords support number is open from 9:00 am – 8:00 pm EST Monday – Friday. Tell them the accounts you want to raise the threshold on and they will most likely take your number and email down and let you know they will check on the account(s) to make sure it is eligible.
And that is it! Pretty simple and now your accountant won’t hate you. Also it might be worth mentioning that if you have a very high spend you could be eligible for monthly invoicing from Google instead of charging it to a credit card. Some businesses might prefer doing it this way.
[alert-note]Note: Google got back to me within 2 hours and the thresholds were raised.[/alert-note]Tip 13 – Easy filters for tiered bidding approach
I like to use what they call the tiered bidding approach in AdWords, and it works very well. A tiered strategy can help you drive search queries to the optimal match type and view the correct ad. What is a tiered bidding approach? Basically it is bidding in order by match types. (This applies if you have mixed match types in the same ad groups.)
For example:
- Exact Match: $5
- Phrase Match: $3
- BMM: $2
This way a broad match modifier will never override your exact match. If your broad matches are triggering exact match keywords this is a big no no when it comes to reporting.
Now with all the optimizations you are making it would normally take forever to implement this approach. However, if you use filters you can easily apply this method.
Step 1
In Adwords click into “Filter” and on “Create filter.”

Step 2
Select “Match Type” from the dropdown and then create 3 separate filters. One with exact match, phrase match and broad match.
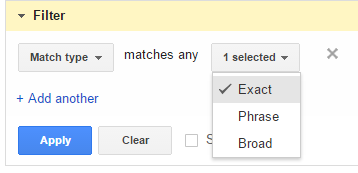
You should now have three filters to choose from.

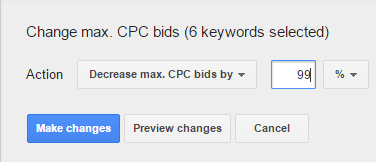
Step 3
Then you can select all the keywords in an adgroup and under “Edit” select decrease max. CPC bids by 99%. This will bring everything in the adgroup basically down to zero.
Step 4
Then under “Edit” select Raise to estimate first page bid. This is usually a good foundation to start with in ad groups.
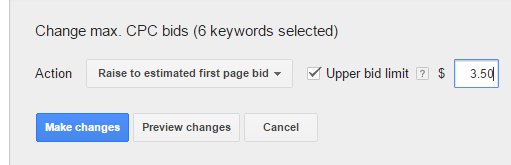
Step 5
Then select one of your match type filters. I will select the “Exact” match type filter we created in step 2 and then under “Edit” I will increase the max. CPC bids by 15%.
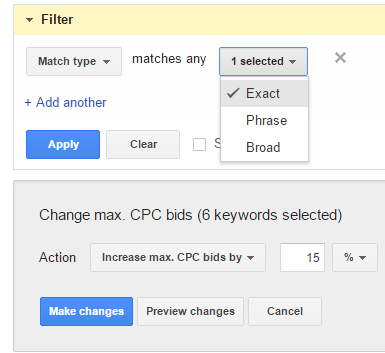
Then you can do the same with phrase match and broad match, but a lower percentage. So I would raise the phrase match up by 10% and then the broad match up by 5%. This way the bids are tiered. And then of course you will probably want to do some manual tweaking as well based off of the data, but this can be a good quick way to apply tiered bidding approach to an ad group.
Tip 14 – Add Sitelink Extensions
Sitelink extensions can dramatically help your CTR and conversions. Nobody should have a campaign running in Adwords without them. If you don’t have them, follow the steps below right now!
Step 1
Click into your campaign and then click on the “Ad Extensions” tab.

Step 2
Make sure you have sitelinks selected and click on the “New Sitelink” button. You will then have a popup where you can create your sitelink. I recommend adding some type of CTA within it.

Make sure to revisit the sitelinks after you have some data as you will want to treat them the same way you do keywords. Pause the bad performers and increase spend on the ones with more conversions and higher CTRs.

Tip 15 – Add Location Extensions
If you are a local business then location extensions are a must! This makes it so your address and location information show up with your ad. To do this you will need to make sure you have your Google My Business locations verified with a pin. See more information here: https://support.google.com/adwords/answer/2404182?hl=en
Tip 16 – Add Call Extensions
Are you a business with a phone number? If you are then you should be running call extensions. Call extensions have typically increased clickthrough rate by 6-8%.
Step 1
Click into your campaign and then click on the “Ad Extensions” tab.
Step 2
Make sure you have call extensions selected and click on the “New Phone Number” button. You will then have a popup where you can create your call extension. You can use a free forwarding number that Google gives you or a 3rd party call tracking number. I use CallRail for my call tracking.

Tip 17 – Add Review Extensions
If you have third party reviews than I definitely recommend adding review extensions. Having one killer review/testimonial can mean the different between a click and them simply skimming over your add. Read more about review extensions.
Tip 18 – Add Callout Extensions
Callout extensions are great for showing additional information pertaining to your add, such as..
- Free shipping
- 24-7 customer service
- Price matching
Read more about callout extensions.
Tip 19 – Increase Your Quality Scores with Tenscores
If you aren’t that familiar with quality scores you might be wondering what all you can benefit from if you spend time raising them. Well here is a quick list.
- Lower CPC (means more budget to play with!)
- More traffic (the higher your quality score the greater your impression share and ad rank)
- Lower Minimum bids
- Top Positions (If your quality score is suffering, you will never show at the top)
- Extensions (Sitelink extensions and location extensions will show more often)

Tenscores is by far one of the best AdWords optimization tools I have ever used.
Client #1 Before Tenscores (June 07)
Overall account quality score of 6.86 and average CPC of $2.35.
Client #1 After Using Tenscores (June 14)
After simply using the tool, following recommendations, and really honing in on what it said I increased the quality score of the account to 7.38 and lowered the average CPC to $1.79 within only 7 days!
Client #2 After Using Tenscores for 3 days!
Here is a tweet/snapshot from one of my accounts after only 3 days.
Check out my full review on Tenscores.
Tip 20 – Split Test Your Ads
You should always be split testing your ads to see which ones are converting better. You can use experiments to do this, but I prefer a straight split test in AdWords settings. You will want to setup a new campaign when you do this so that the impressions are split evenly down the middle.
Step 1
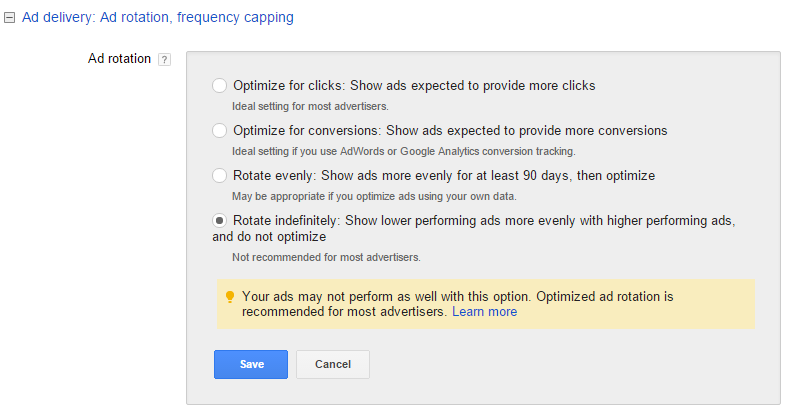
Click into the “Settings” tab and then into “All Settings.”

Step 2
Scroll down and under Ad rotation set it to “Rotate indefinitely.” This means it will split test your ads evenly, even the bad performers. Then you can go back into your ads after 30 days or however long you are testing for and analyze which ones are converting/performing better.
Tip 21 – Change Device Bid Adjustments
You should always be adding bid adjustments based on which devices are converting better. Again I always recommend looking at 6+ months worth of data if you have it. You might be surprised but almost all of my client’s campaigns are converting more on mobile now than desktop. It’s not the same as it was 2 years ago, so make sure to keep up with the change in technology!
Step 1
Click into the “Settings” tab and then click on “Devices”.
Step 2
Look at the data for your devices and see which ones are converting better. Of course you will want to look at CPC, Cost / converted click, etc. But then add a bid adjustment to ensure that your budget is going towards what is working. As you can see in my example mobile is converting way better in this campaign then desktop. I should probably even increase my bid adjustment more.

Tip 22 – Change Location Bid Adjustments
The same strategy as device bid adjustments applies here with locations. If one location is performing well, then maybe you should reallocate more funds to really dominate that area. Or perhaps an area isn’t performing well and it needs an increase in budget. Bid adjustments are so important!
Step 1
Click into the “Settings” tab and then click on “Locations.”
Step 2
Look at the data for your locations and see which ones are converting better. Of course you will want to look at CPC, Cost / converted click, etc. But then add a bid adjustment to ensure that your budget is going towards what is working.

Tip 23 – Use Radius Location Targeting
If you have multiple locations then I highly recommend using radius targeting, especially from the start of your campaign. This goes hand in hand with Tip #7. If you use radius targets you can set radius’s with 5 miles, and then another with 10 miles, etc. This allows you to use bid adjustments like in Tip #22 and bid more aggressively on people that live closer to you and less on those that live farther away. You can save a lot of your ad spend if you use this strategy vs simply targeting an entire city.
Step 1
Click into the “Settings” tab and then into “All Settings.”
Step 2
Scroll down to Locations and click on “Edit.” Then click into “Advanced search.”

Step 3
You can then add radius targeting. On a new campaign I recommend using 5 miles, 10 miles, and possibly 15 miles. Then after a couple months look in your locations data to see which ones are converting the best.

Tip 24 – Location Target and Exclusion Options
You should always take a moment and setup the location target and exclusion options in each of your campaigns.
Step 1
Click into the “Settings” tab and then into “All Settings.”
Step 2
Click “Edit” next to target and select the appropriate one which suits your campaign.
- People in, search for, or show interest in my targeted location (recommended). “Your ad can appear for anyone who is likely to be physically located in your targeted location. Your ad can also appear for anyone who shows interest in your targeted location. People can show interest through terms used in their searches, content that they view online, if they were recently in a location, or other methods.”
- People in my target location. “Your ad can appear for anyone who is likely to be physically located in your targeted location, even if she shows interest in other locations.”
- People searching for, or who show interest in my targeted location. “Your ad can appear for anyone who shows interest in your targeted location. People can show interest through terms used in their searches, content that they view online, if they were recently in a location, or other methods.”

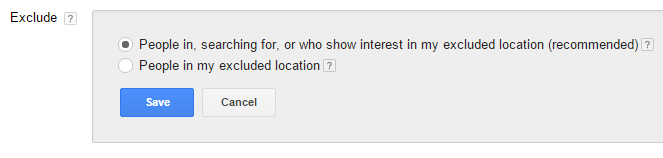
Step 3
Click “Edit” next to exclude and select the appropriate one which suits your campaign.
- People in, search for, or who show interest in my excluded location (recommended). “Your ad won’t appear for anyone who is likely to be physically located in your excluded location. Your ad also won’t appear for anyone who shows interest in your excluded location. People can show interest through terms used in their searches, content that they view online, if they were recently in a location, or other methods.”
- People in my excluded location. “Your ad won’t appear for anyone who is likely to be physically located in any of your excluded locations. Your ad could appear for people who aren’t located in your excluded locations, but who show interest in your excluded locations.”
Tip 25 – Targeting Multiple Languages
Depending on your location you could be missing out on huge opportunities. For example, if you are located in a heavily Hispanic area they most likely still have their browser set to English. Which means you don’t necessarily have to translate your ads. I recommend at least targeting both English and Spanish in your campaigns. Andrew Lolk also mentioned this in his article “Typical AdWords Mistakes: Campaign Settings“
Tip 26 – Setting your Bid Strategy
You should always determine which type of bid strategy is appropriate for your campaigns. And this might be something that changes over time. Generally the best practice is to start a brand new campaign with a “Focus on clicks” and “Enabled Enhanced CPC” disabled. After you get some data I recommend enabling Enhanced CPC. And after you have a consistent 100+ conversions per month you might want to look at bidding by CPA. I have had great success with CPA bidding, but you need quite a bit of consistent conversion data for it to work well.
Step 1
Click into the “Settings” tab and then into “All Settings.”
Step 2
Then select the type of bid strategy you want.
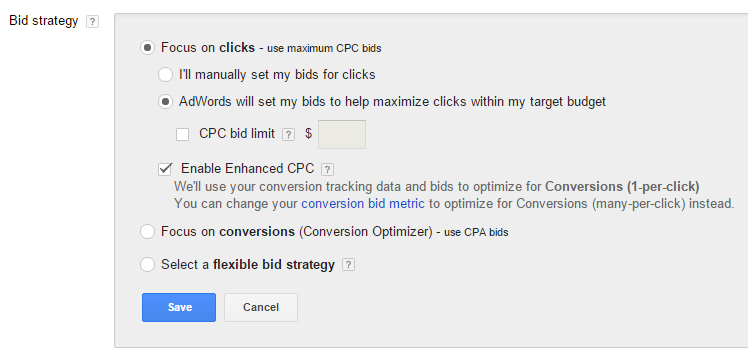
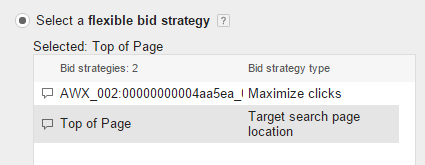
You can even setup flexible strategies. For example, in one of my campaigns I have it running with a “Top of Page” bid strategy as that converts very well for that campaign.
Read more about flexible bid strategies.
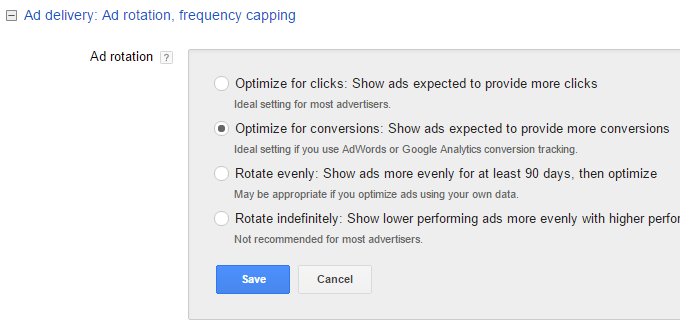
Tip 27 – Changing Your Ad Rotation
I showed you in Tip 20 about how to split test your ads, but you will want to make sure you have your ad rotations setup appropriately for each campaign. I recommend “Optimize for conversions.” On normal search campaigns that seems to perform the best, especially if your number one goal is to generate conversions.
Step 1
Click into the “Settings” tab and then into “All Settings.”
Step 2
Click on the ad rotation that works best for your campaign. I recommend “Optimize for conversions” unless you are split testing or running experiments.
Hopefully this list on tips to optimize your Google Adwords campaigns was helpful! Do you have any other good optimization tips that you think I should add? If so, please comment below.
That’s a great list of tips Brian. #19 is my favorite! ;)
Thanks Chris! I knew you would like #19 :)
GREAT list of optimizations! I run a lot of campaigns for clients, and always look for small tweaks that can have an impact. I’ll definitely be tweeting this out!
Great, glad you liked it Luke! I actually wrote this because I kept getting friends asking me to help them with their AdWords accounts lol. I have way too many projects at the moment to help them, so I told them I would do one better, write them a blog post :)
You have some useful tips in this article..
Thanks Rydal! Glad some were helpful.
you are welcome..
This is very helpful. Pretty much applied everything on my campaigns. Thanks
Wow, this is super helpful! Wish I had come across this sooner when I wasted tons of money doing trial and error on Adwords. Thanks for writing this up! I’ve used only a few tips so far and they’re working well!