
WordPress is the leading and most popular Content Management System (CMS) in the world. In fact, it currently powers over 43% of all websites on the internet and continues to gain market share year after year. Prestigious brands and organizations like Stanford, NASA, The National Archives, Creative Commons, Sony Music, Fortune, and even The White House use WordPress to power their sites.

In my 20+ years of working on the internet, I’ve used all types of platforms, such as Drupal, Joomla, Ghost, Medium, and many more. I think WordPress is by far the best solution for every sector: SMBs, educational institutions, high-traffic blogs, and even enterprise sites.
Why? Because WordPress gives you the most control and flexibility in building, managing, and marketing your website. However, just using WordPress isn’t enough; speed plays a big part in ensuring you succeed. And that’s what we’ll dive into below.
No one likes a slow website (including Google)
While WordPress is incredibly popular, using it can also come with a performance cost if you don’t know what you’re doing. Initially, WordPress was primarily a blogging platform. But it has evolved into much more than that, as more functionality was added over the years. The problem now is that with so many different configurations and options, WordPress can run slow if not set up or optimized correctly.
Why does a slow website even matter?
Because it will always be very detrimental to a visitor’s experience and first impression. It plays a significant factor in bounce and conversion rates. The days of dial-up are long gone, and people don’t have the patience they used to. If they have to wait a long time for a page to load, they’re most likely going to hit the back button and pick the next search engine result.
A 1 second delay in page response can result in a 7% reduction in conversions. — Kissmetrics
If you were able to increase your website by 3 seconds, that means an approximate increase of 21% in conversions!
Just like WordPress has evolved over the years, so has the measurement of performance. While total load time is still important, it’s not a measurement you should focus on anymore. Google now uses what they call Core Web Vitals. Your site gets a score based on a combination of things like the largest contentful paint (LCP), first input delay (FID), and cumulative layout shift (CLS).

To put it simply, while the amount of code will always matter for performance, you also now have to consider how your website loads the code.
And to throw another wrench in the mix. Mobile page speed is also a ranking factor. Google uses this for indexing your site in SERPs. The good news is that you can improve your rankings by increasing your site speed. It can also help increase the frequency in which Google crawls your site. This will get your content indexed faster and show up in SERPs sooner.
Accelerating websites is extremely important. Faster websites mean satisfied customers. PageSpeed becomes significant for rankings. — Matt Cutts
Another important thing to note is that pages with noindex don’t impact Core Web Vitals (source).
Where do you start?
The first thing you should do is test your WordPress site’s speed. This will give you a benchmark you can use as a baseline. I recommend using the free PageSpeed Insights tool. This is developed by Google, powered by Lighthouse, and uses Core Web Vitals for scoring.
GTmetrix is another handy tool that uses Core Web Vitals in many of its performance metrics. They also let you see a waterfall of your assets, which is sometimes needed to get a better picture of what is going on. However, be aware that the free version only shows your scores on desktop, not mobile. For additional mobile testing, you might want to check out DebugBear or WebPageTest.
Due to caching, CDNs, and other third-party scripts, make sure to always run your speed tests at least three times to get an accurate result. And regardless of the tool you use, it’s important to pick one and stick with it. Each tool measures speed differently, and you need an accurate baseline to monitor performance improvements.
If you need to measure queries and database load performance, Query Monitor and New Relic APM are great solutions. If you’re hosting with Kinsta, they also have a free APM tool in their MyKinsta dashboard.

Speed up WordPress (front-end, back-end)
This post will cover, step by step, exactly how I configure all my WordPress sites, a mix of high-traffic blogs and ecommerce sites. It contains recommendations that apply to both the front-end and back-end (WordPress admin dashboard) and optimizations specifically tailored for Google Core Web Vitals.
First, a little bit about me: I’ve been using WordPress for 14+ years. I previously worked for Kinsta; a high-performance managed WordPress hosting company. Before that, I worked for KeyCDN, a global content delivery network. So you could say that web performance is in my blood.
I’ve spent thousands of hours optimizing WordPress sites to ensure that they are running at optimal performance. As an internet marketer, WordPress has helped me achieve incredible things, and it can also help you! Just follow the steps below to speed up WordPress instantly.
I promise you, no matter what your background or level of expertise, you’ll find something in this post that is useful.
1. Invest in fast WordPress hosting
Impact: Front-end and back-end speed (WordPress admin dashboard).
One of the easiest and most important ways to speed up WordPress is to start with a solid foundation. And that means you need to pick a fast and reliable WordPress host. Unfortunately, this first step is where a lot of people mess up. Many underestimate just how much of an impact a hosting provider has on your performance. Getting this right will save you so much time and frustration.
If you’re on a small website, you’re most likely on a cheap shared web hosting plan. The name of the plan itself defines what it is. The term “shared” means that your website is hosted on a server along with a lot of other people’s websites. This means they are all fighting over the same resources.
When it comes to hosting, there’s no such thing as “unlimited resources.” 🙅 This is simply a marketing gimmick.Click to PostI’m sure you see bloggers and affiliate marketers all the time advertising cheap hosting providers like BlueHost or GoDaddy. Sorry to be the bearer of bad news, but 99% of these sites are run by affiliate marketers merely trying to make a quick buck. Most of the time, they don’t even use them; they’re only trying to refer as many as they can.
Picking a cheap host is one of the worst decisions you could ever make when hosting your website. For example, did you know that BlueHost is owned by Newfold Digital (previously EIG)? Newfold Digital is a corporation that has been buying up all the low-performing hosts for years. Here is a full list of hosts owned by Newfold Digital. You can pretty much expect the same horrible service from all of them. All they care about is their bottom line.
While it’s true that I’m also an affiliate marketer, my passion for web performance has always trumped that. I only recommend hosting providers that I actually use for my own sites (including woorkup). Picking the right host means you don’t have to worry about downtime or speed. Below are two WordPress hosting providers that I stand behind 100%.
SiteGround
If you’re looking for more affordable WordPress hosting, I highly recommend SiteGround. They offer managed WordPress hosting on Google Cloud Platform with HTTP/3 (QUIC), PHP 8, SSD, and tons of other features starting at only $6.99 a month! This is about as good as it gets for cheaper hosting folks. Make sure to check out my in-depth SiteGround review.

SiteGround is an excellent choice if you need an affordable host that always stays up to date with the latest technology. However, once you start getting a lot of traffic, I recommend investing in a more premium hosting provider like Kinsta.
Kinsta
If you’re looking for high-performance managed WordPress hosting, I have nothing but praise for Kinsta. Their vast feature set is what sets them apart from other hosting providers. Kinsta’s infrastructure is powered by Google Cloud Platform and its premium tier network. They use the fastest machines available (C2 compute-optimized VMs) across all of their plans.
Kinsta uses isolated software containers, which means no resources are shared between sites, making it ideal for scalability and security. If you want a snappy WordPress admin dashboard or are about to air on Shark Tank, this is the host you need. Some of their current clients include big names like Buffer, Flippa, Mint.com, Ubisoft, and TripAdvisor.

Some of Kinsta’s features and tech stack include 36+ data center locations, Nginx, PHP 8.3, HTTP/3, free CDN (with edge cache) and SSL, staging sites, MariaDB, uptime monitoring, APM, and DDoS protection. Having the latest PHP version is more important than you might realize. Why? Because PHP 8.3 is 6.96% faster than PHP 8.2 (measured in requests per second), and 13.42% faster than PHP 7.4 (source). That’s a free performance boost with no work done on your part.
Kinsta also has the best support in the business! Their expert WordPress team is there to help 24/7. All of my sites, including woorkup, are hosted with Kinsta. Make sure to check out my in-depth Kinsta review.
Beyond hosting, Kinsta provides an incredible free local development tool called DevKinsta. You can use this to easily set up local WordPress test environments in a matter of minutes. A big advantage of using this over a staging site is there is no network latency.
2. Implement caching
Impact: Front-end and back-end speed (WordPress admin dashboard)
When a user hits your site for the first time, the server processes the request, including all the database queries needed to render the page. The page is then delivered to the user’s browser. The initial processing time is why it’s so important to have a fast hosting provider.
Cache is the layer that sits in-between your server. The cache is built and stored in RAM or disk during that initial request, and subsequent requests hit the cache layer instead of your server. This results in lightning-fast speeds (up to 40% faster in my testing) for the user as it essentially bypasses the server processing phase. Another benefit is that it also reduces the load on your server.
If caching isn’t set up correctly, this will cause higher time-to-first-byte (TTFB) and what is also referred to as “wait time.” Regarding Google Core Web Vitals, this will generate a warning to “reduce initial server response time.” The warning triggers if the TTFB is higher than 600 ms (source).

As mentioned earlier, due to caching, make sure to always run your speed tests at least three times to get an accurate result. If your site’s cache just expired, you will see the above warning the first time you run the test.
Caching is typically implemented in two different ways:
Server-level caching
Server-level caching is what I recommend because it’s fast and easy. WordPress hosting providers like Kinsta have server-level cache already in place for you, and there is no hassling with plugins or settings. Everything works out of the box, whether you have a high-traffic blog or a more dynamic ecommerce site. I don’t have any caching plugins running on this website.
WordPress caching plugin
If your hosting provider doesn’t have server-level caching, that’s when you need to install a WordPress caching plugin. I’ve tested many caching plugins over the years, and I recommend going with one of the following:
- WP Fastest Cache (free)
- Super Page Cache for Cloudflare (free)
- WP Rocket (premium)
Improve your caching
An easy way to improve your caching is to increase the cache expiration time on your WordPress site. Longer cache times lead to improved site performance, and better cache HIT ratios. It can also fix the warning from Google to “serve static assets with an efficient cache policy.”

Below is an example of what happened when we increased our Kinsta cache expiration time from 1 hour to 7 days. As you can see, the HIT cache ratio percentage jumped dramatically! That means more visitors are getting our website delivered using the lightning-fast cache, and fewer PHP workers are required.

If you’re hosting with Kinsta, the following cache length times are available right from the MyKinsta dashboard:
- 1 hour
- 2 hours
- 4 hours
- 8 hours
- 24 hours
- 7 days
- 30 days
- 1 year

Kinsta has rules to automatically purge single pages and critical pages such as the home page immediately when you make updates. This ensures high availability at all times and also makes sure your visitors see your most recent updates.
If you’re using a different hosting provider or caching plugin, check their documentation or ask their support to see how to increase your WordPress site’s expiration time.
3. Use a Lightweight WordPress theme
Impact: Front-end and back-end speed (WordPress admin dashboard)
WordPress themes can make or break your site. There are a ton of bloated themes out there that can bring your site to crawl. Even with fast WordPress hosting and caching implemented, the amount of code and requests still matter, especially when it comes to Google Core Web Vitals.
When you’re looking for a WordPress theme, you also want to make sure you’re buying from a reputable company with good developers and support.
I’ve used GeneratePress for all my WordPress sites, including my blogs and ecommerce sites, for the past 5+ years. I couldn’t be happier and can’t recommend it enough! GeneratePress is lightweight and still includes loads of functionality.

The base install of the GeneratePress WordPress theme scored 100/100 according to Google. And this test is emulated for mobile devices. Very impressive!

I also want to mention that you should be careful about buying themes and products on ThemeForest. I’m not saying that all developers on ThemeForest are bad, but unfortunately, many of them simply add bloat to increase their sales. Check out my in-depth GeneratePress review.
Page builders are destroying the internet
I’ve worked on thousands of WordPress sites over the years, and all the really slow ones have one thing in common: Page builders. If you want a fast site, you need to move away from page builders now.
Page builders were originally developed due to the lack of being able to easily design a website without code. Let’s be honest; it was hard to build a WordPress site five years ago unless you knew how to code. Page builders served their purpose, as many WordPress folks are “website implementors,” not coders. And that’s why many page builders experienced skyrocket growth.
However, these days, things are very different. You now have amazing plugins like GenerateBlocks, which lets you design websites with 1/10th of the amount of code! Oh, and you don’t have to do any actual coding either.
Take a look at the overall codebase size of GenerateBlocks versus Elementor, Oxygen, and Divi.
- It’s 87% smaller than Oxygen.
- It’s 93% smaller than Elementor.
- It’s 96% smaller than Divi Builder.

Of course, you don’t have all the fancy bells and whistles, but these are the very things that are causing problems for you trying to rank higher with Core Web Vitals. Let’s take sliders, for example. Sliders should have died years ago, but they are still around. These cause cumulative layout shift (CLS) warnings. It’s much better to design a static header. Ditch the animations, ditch the moving parts.
Then you have the DOM (Document Object Model). To put it simply, whenever a page loads, the browser parses the HTML of a page and renders the DOM. Think of this as a structured tree in a sense. However, this isn’t just the HTML source code, as JavaScript can manipulate it. Check out this article on what, exactly, is the DOM?
You don’t need to fully understand the DOM, just that the more layers of code you have, the more DOM elements will be on a page. A common problem among page builders is an excessive DOM size. This is because they are essentially adding additional code like nested divs, which create a bigger DOM. The bigger the DOM, the more you’ll be penalized in terms of performance.
Plugins like GenerateBlocks work a little differently. While they still add code, they work more closely within the already existing code parameters in WordPress core. It also adds less code in general, to begin with, because it was developed from the ground up with performance in mind. That’s why many Core Web Vitals warnings just never appear.
GenerateBlocks only adds one CSS file per page, which contains all of the CSS generated by your options. There is no Javascript or inline CSS – it’s all in one, tidy place. Page builders, on the other hand, typically load dozens of files on each page.

Many think it all comes down to a trade-off between performance or design. However, this is no longer the case. Many of the page builder sites I’ve worked on can easily be re-created with a plugin like GenerateBlocks. Make sure to check out my in-depth GenerateBlocks review.
That’s why GeneratePress + GenerateBlocks is the best combination for sites right now. You can literally build whatever type of site you want (without needing to know how to code), and that’s why I highly recommend using both of these solutions. Your site will be future-proofed for performance and Google Core Web Vitals.
4. CDN
Impact: Front-end speed.
No matter how fast your WordPress hosting provider is, you can never beat the network latency issue. It’s basic math. Your data is stored physically on a server in a data center, and things get slower for users the further away they are as it has to download your website over a great distance.
A content delivery network (CDN) fixes that by storing copies of your assets (images, CSS, JS, and even HTML) on edge servers around the globe. It also caches them. When a visitor looks up your website, the content is delivered from the closest geographical edge server (cache) instead of your web server.
Have you ever wondered how certain companies, like Starbucks and Amazon’s website, always load fast no matter where you travel? That’s because they utilize a global CDN. In fact, according to BuiltWith, 62% of the top 10k websites are using a CDN.

How much does a CDN help? I’ve seen a CDN increase speeds of a WordPress site by up to 68%! Remember, a lot of it will depend on the physical distance. You should see drastic differences at locations further away.
A CDN is also great for scalability and reducing hosting costs. It makes it easier for your site to scale up and down due to traffic spikes because, a lot of the time, the load is the responsibility of your CDN. In some of my tests, a CDN handled more than 75% of the load. This reduces the work on your WordPress host, helps minimize downtime, and saves you money on bandwidth or traffic costs.
However, this doesn’t negate the importance of having a robust caching solution set up with your hosting provider. The reason is that cache on a CDN expires. When it does, you want a fast fallback layer.
There are two CDN providers I recommend, each with a slightly different approach you can take:
Cloudflare with APO
Cloudflare is by far the most popular and prominent CDN provider with 270+ edge locations around the globe. However, they are not a traditional CDN. A traditional CDN is more like an add-on that caches and delivers only your assets (images, CSS, JS) around the globe. Cloudflare is a reverse proxy.
A reverse proxy means you point your website (DNS) at Cloudflare and route all of your traffic through them. They sit in-between your website and the public internet.

The downfall to being a full-proxy service is that routing takes time. In the past, Cloudflare had the problem where this overhead might increase your wait time (TTFB). However, those days are gone. They now have a service called Automatic Platform Optimization (APO), which caches your entire site, not just the assets but also HTML, at the edge server.
Why is this such a big deal? Because in the past, a request would go to your hosting provider’s server to download the HTML and your CDN to download the assets (images, CSS, JS). With APO, all of the requests go directly to the Cloudflare edge server closest to the user (images, CSS, JS, and HTML).
This eliminates the wait time (TTFB) issue and is insanely fast! It also doesn’t have to preload cache per edge server like a traditional CDN. APO uses its KV to store the cache, and on the first visit, it gets instantly distributed across all their edge servers. For most sites, you can think of it as automatically hosting a separate copy of your website around the globe. You also don’t have to mess with any confusing page rules. It also automatically caches query parameters for things like UTMs, FB, Google Ads, etc.
The CDN service from Cloudflare is free, and the APO service costs $5/month per domain, regardless of how much traffic you get. So it’s very cost-effective! If you’re curious, I’m using Cloudflare’s APO service on this website. All you do is sign up for APO and install the free Cloudflare WordPress plugin.
Kinsta actually includes this (edge cache) for free for all of their clients!
Make sure to also check out these recommended settings for Cloudflare for the best performance.
Alternative Cloudflare solution
If you want a completely free solution that is highly customizable, I also recommend the WP Cloudflare Super Page Cache plugin. This achieves the same type of full page edge cache and low wait time (TTFB). The only difference is that it does have to preload the cache per edge server. The developers of this plugin are incredibly helpful and quick to respond.
KeyCDN
If you’re looking for a traditional CDN, then I highly recommend KeyCDN. At $0.04/GB, they are incredibly affordable, and their speed is ridiculously fast. A blog with a decent amount of traffic is usually in the 20-25 GB bandwidth range, and with KeyCDN, it would cost less than $5 per month.

KeyCDN has been around for many years, and their service is exceptionally reliable (even more so than Cloudflare), which is very important when it comes to CDN providers. They offer 40+ edge locations, Let’s Encrypt SSL, origin shield, and secure tokens free of charge. They also provide WebP caching.
Make sure to check out my full KeyCDN review. You can also use our Perfmatters plugin to deploy KeyCDN to your WordPress site.
5. Image Optimization
Impact: Front-end speed.
Optimizing your image sizes and delivery is something you can’t ignore. According to The HTTP Archive, as of February 2021, images make up on average 48% of a total website’s page weight on mobile devices. That’s pretty close to half of the assets the browser has to download and deliver to a user.
That’s where image compression comes into play.
Image compression
Compression is a way to make your image files smaller by removing data. It’s one of the easiest ways to decrease your website’s total size, and once you have a sound system in place, it can ultimately be hands-off.
Uploading full-resolution images onto websites, especially those on small shared web hosting plans, will instantly slow down your website’s load time. You would be surprised by how much some images can be compressed without any quality degradation.
I compress all my images using lossy compression with the ShortPixel WordPress plugin. This ensures small page weight sizes and fast loading images that still look beautiful. Every image I add to a page or post is automatically compressed behind the scenes in the media library. My recommendation is always to keep your images under 100 KB.
I also take advantage of the .webp image format. This is an image format developed by Google that is much smaller than PNGs or JPGs. It’s now supported by all modern browsers. I use WebP images on all my sites. The ShortPixel plugin can also do this for you automatically.
How much smaller is the WebP file format? Well, take one of the images on this blog post, for example. The PNG image is 60.6 KB, while the WebP version of the same image is 16.3 KB. That’s a 73.1% decrease in size!
Google also recommends using WebP images. Doing this will fix the warning “serve images in next-gen formats.” You could also take it further with the newer AVIF format.

It’s also important in the ShortPixel plugin settings to exclude the thumbnail sizes you don’t use on your site. This will save you credits and also make for faster image compression. As you can see below, on this site, I exclude everything except for medium, medium_large, and large.
You can also check out the other image compression plugins I recommend.
Lazy load images
Beyond image compression, you can also optimize the delivery of your images by using lazy loading. This is the method of delaying or deferring the loading of images until a user scroll down the page (images enter within the viewport).
Why does this work so well? Let’s say you have a long-form blog post with 50 images on it. By default, the browser will load all 50 of those images when someone visits the site. Even with optimized images, this can take a while, especially on mobile.
If you lazy load the images, it will only load the images towards the top of the page that the user sees in their browser. The number of images varies based on the type of browser, lazy loading method, viewport’s size, etc. But regardless, the idea is that it usually cuts down on 85%+ of the image requests.
Google actually recommends lazy loading. If you don’t implement it, you’ll see the following warning to “defer offscreen images.”

WordPress 5.5+ has native lazy loading by default. However, we recommend using the lazy loading solution in Perfmatters. Why? Because our solution is faster and better than native lazy loading. You can read more about the lazy loading in Perfmatters.
To enable lazy loading in Perfmatters, simply toggle it on, and you’re good to go. It also supports lazy loading inline background images and CSS background images.

Image width and height
It might sound relatively simple, but an easy way to improve your CLS and reduce layout shifts is to confirm that all of your images have a width and height attribute set. If an image is missing these attributes, you’ll most likely see an “image elements do not have explicit width and height” warning from Google.

Any well-coded theme like GeneratePress should be adding these attributes for you. If your theme isn’t, I recommend reaching out to the developer, as it really should be addressed at the source. Or you can add missing width and height attributes automatically with our Perfmatters plugin.
Properly size images
Another common warning that comes up is to properly size images. If you’ve moved to a new WordPress theme at some point in time, you’ll probably see this.

This warning gets triggered if an image being served by the browser is bigger than its container. You have two different ways to fix this:
- Regenerate your image thumbnails. Pretty quick and easy.
- Force smaller images on smaller screens. This requires a little bit of code. Your theme developer can probably provide this for you.
Check out more details on how to fix the properly size images warning.
Preload critical images
Preloading leading images (those above the fold) can help decrease Largest Contentful Paint (LCP) times in Core Web Vitals. These are typically images like a logo, a featured image on a blog post, a hero image on a landing page, etc. By preloading them, you’re moving them to the top of the waterfall and essentially telling the browser that these have priority and should be loaded right away.
You can manually preload images in our Perfmatters plugin or even automatically preload critical images.

6. Optimize database and reduce disk space
Impact: Front-end and back-end speed (WordPress admin dashboard).
The next thing to do is to ensure that your WordPress database is optimized and that you aren’t wasting disk space.
Before proceeding, it’s always good practice to take a backup of your WordPress site. If you’re using a host like Kinsta, you can take a one-click snapshot. Otherwise, you can use a WordPress backup plugin.

InnoDB database tables
If you’ve never done any database optimization before, the first thing you’ll want to check is that you don’t have any mixed MyISAM and InnoDB tables.
For a long time, there were two different types of storage engines: MyISAM and InnoDB. MyISAM is now deprecated, and InnoDB has been the default storage engine since the release of MySQL 5.5. To this day, I still see sites with old MyISAM tables. InnoDB has proven itself to be much faster, and that’s what you should be using for your database tables.
Follow this tutorial on how to check and convert MyISAM to InnoDB. When it comes to easy ways to speed up WordPress, this is often an overlooked optimization.
You should treat WordPress just like a car, that means oil checkups, tuning, etc. 🚗Click to PostPage and post revisions
Out of the box, WordPress stores revisions of posts and pages when you make changes. This is handy in case you need to revert to an older version. The bad news is that there is no limit on how many revisions are stored. On large sites, this can quickly bog your database down. How many revisions do you actually need?
The first you’ll want to do is clean up the old revisions and then put a limit in place going forward.
Our Perfmatters plugin provides an easy way to clean up and delete revisions for posts, pages, and custom post types. If you’re looking for a free solution, the WP-Optimize plugin also works.
As you can see below, in my case, 630 revisions were sitting in the database. None of these will probably ever be used, so it’s good to clean these up and start with a fresh slate.

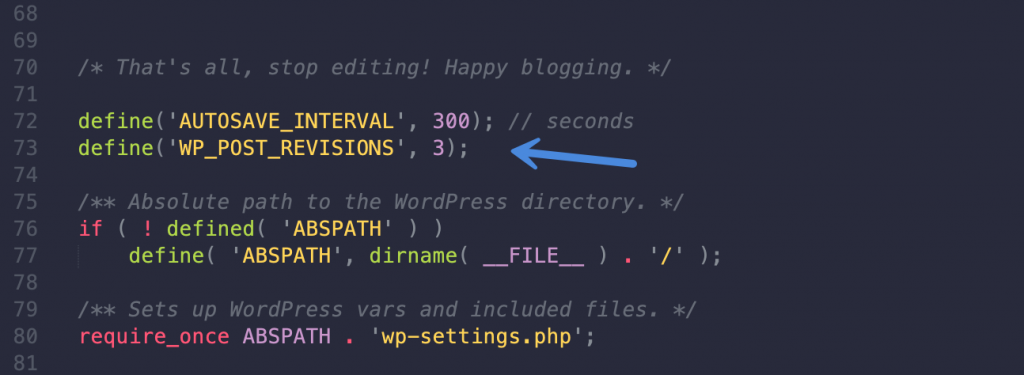
After cleaning up the old post revisions, it’s time to limit the number of revisions. This will ensure they don’t start filling up the database again down the road. There are a couple of ways you can do this. I recommend using our Perfmatters plugin. You can limit or disable them with a single click, as seen below.

Or you can do it manually by adding the following code to your wp-config.php file. In this example, I am limiting it to three revisions.
define('AUTOSAVE_INTERVAL', 300); // seconds
define('WP_POST_REVISIONS', 3);
It’s important to add the code above the 'ABSPATH'; otherwise, it won’t work.
You can also disable revisions altogether.
Delete old or unused images
Over time you probably have unused images that are taking up disk space on your server. This can cause performance issues in various places, even just when taking backups of your site.
I recommend using the Media Cleaner plugin. This helps clean up your media library from the entries (and files) which aren’t used on your WordPress site. Make sure to take a backup before running this.

Another thing to watch out for is if you’ve previously migrated from one image optimization plugin to another. Some use different file extensions. For example, if you migrated over from Imagify to ShortPixel, you might have leftover images with a .jpg.webp and .png.webp extensions sitting in your site’s uploads folder. This can easily account for hundreds if not thousands of additional images.
You can use a script or connect to your site via SFTP and do a quick search for these extensions and delete them. Make sure to check with your current image optimization solution to confirm which extensions they are using.

Clean up auto-drafts, spam comments, transients, etc.
It’s also important to clean up other old data you might have lying around. This includes auto-drafts, spam comments, comments in trash, posts and pages in trash, expired transients, etc. All of these things contribute to a larger WordPress database size.
The database optimization features in our Perfmatters plugin provide is an easy and fast solution for this. Just a few clicks and you’re good to go.
Check wp_options table (autoloaded data)
Autoloaded data is a field that accumulates in your wp_options table. Over time, this can quickly bring a WordPress site to a crawl. This data is loaded by plugins on every page of your site. It’s healthy to keep this field’s total size below 5 MB, or 1 MB if possible.
There are two ways to check the size of the autoloaded data on your site. The first is to install the free Performance Lab plugin from the WordPress core team. This will show you the total size under the Site Health tool.

The second way to check is to open phpMyAdmin from your hosting provider’s control panel and use the following query:
SELECT SUM(LENGTH(option_value)) as autoload_size FROM wp_options WHERE autoload='yes';To dive even deeper into this topic, check out this article on how to clean up autoloaded data.
Delete data from old plugins
How many plugins have you tried over the years and removed? Probably a lot. Unfortunately, many plugins don’t remove everything when you uninstall them, which leaves you with an ever-growing database.
If it’s a well-developed plugin, it should have a clean uninstall option. You can check its documentation. If it has one, you can temporarily install the plugin again and run the uninstaller the right way.
If they don’t have a clean uninstall option, you can manually delete the tables from your database. Be careful with this and make sure to take a backup first.
7. Implement web fonts the right way
Impact: Front-end speed.
According to The HTTP Archive, as of February 2021, fonts make up on average 6% of a total website’s page weight on mobile devices. While that might seem small, it still impacts how your site loads. There are areas regarding performance that you can’t fix on your site, so you should take the wins where you can.
First, I don’t recommend using third-party font services such as Adobe Fonts (previously Typekit). In my testing, I saw an additional 300ms delay. Adobe Fonts adds two external HTTP requests, and it also base64 encodes all the font formats. You no longer need to serve all the font formats; you really only need WOFF 2, if you’re going for extra compression. WOFF 2 is supported by over 95% of all browsers (source).
Second, many websites use more fonts than they need. Make sure to check how many fonts you are loading. You can easily see this in the GTmetrix waterfall.
Below are a couple of options I recommend for better-performing fonts.
Option 1: System font stack (what I do)
I’ll start with my favorite and fastest option you have for web fonts. It’s moving to what they call a system font stack.
Big-name brands such as GitHub, Bootstrap, Medium, Ghost, and even your WordPress admin dashboard all use what they call a system font stack. This means they use the fonts on your computer. A few years ago, this wouldn’t have looked very good. But with today’s newer operating systems, they all have nicer looking fonts pre-installed.
When using a system font stack, there is no need to load any fonts on the page! That is pretty huge! It also eliminates any FOUT (flash of unstyled text) or FOIT (flash of invisible text) ugliness. Our site uses system fonts, and I bet you didn’t even notice. That’s right; this site doesn’t load a single font.
You still might want to weigh the pros and cons. Do you want something that looks fancy, or do you want blazing fast? If you’re using a theme like GeneratePress, it has a one-click option to use system stack fonts. You can also check out my more in-depth tutorial on how to move to a system font stack.

Option 2: Self-host Google Fonts (or custom fonts)
Google Fonts are free, very popular, and used by over 42 million websites worldwide (source). They had one performance advantage in the past, and that was the fonts might already be cached from Google’s CDN in a user’s browser. However, those days are gone.
As of Chrome 86 (October 2020), they have moved to HTTP cache partitioning. This means Google Fonts will be redownloaded for every website, regardless of the fonts being cached in a user’s browser. Safari has done this for years, and Firefox implemented this in version 85 (January 2021).
The solution is to self-host Google Fonts on your server or CDN. This also eliminates the DNS lookup to Google, and your server’s caching HTTP headers will automatically get applied.
To do this, you can download the Google Fonts, upload them to your server, and add the proper HTML and CSS. However, a much easier way is to use one of the following plugins to automate the process:
There are two critical things you should set up:
- Use swap for the font-display property. This is supported in all modern browsers and will make sure the fonts aren’t render-blocking. It will also resolve the “Ensure text remains visible during webfont load” warning from Google.

- Preload the fonts to specify they are needed right away or very soon during the page load. You can also preload your fonts with our Perfmatters plugin.
The same techniques mentioned above can also be applied if you’re using a premium custom font.
GeneratePress users
For GeneratePress theme users still wanting to host Google Fonts externally, you can do the following to fix all the warnings for Core Web Vitals. Note: GeneratePress automatically adds font-display swap to your Google Fonts.
- Grab your Google stylesheet URL from the source code of your site and add it to our Perfmatters plugin Preload section. Make sure to select “style.” Example URL:
https://fonts.googleapis.com/css?family=Roboto:regular,500,700&display=swap

2. Add the following URL to Preconnect in Perfmatters and check the “CrossOrigin” box.
https://fonts.gstatic.com
The above will fix both the “Eliminate render-blocking resources” warning and the “Ensure text remains visible during webfont load” warning.
8. Tweak your font icons
Impact: Front-end speed.
Font Awesome is great, and millions of sites use it on the web to display the icons you see daily. However, by default, it loads its entire library of icons for your site.
The best way performance-wise to approach Font Awesome is to package up only the icons you are using on your site. Here is an excellent tutorial on how to host font icons locally (only the ones you need).
Or, if you’re using a theme like GeneratePress with GenerateBlocks, you can paste in the SVG code of any icon you want. This is amazing! As it means there is no need to package up icons. You can easily add only what you need.
You should also preload your web font icons. Otherwise, you’ll see the following warning from Google about needing to “preload key requests.”

You can preload your web fonts by adding the preload tag to your WordPress site’s header. Here’s an example:
<link rel='preload' href='font-icon.ttf' as='font' type='font/ttf' crossorigin>You can also easily do this in our Perfmatters plugin.
9. Optimize JavaScript
Impact: Front-end speed.
According to The HTTP Archive, as of 2021, JavaScript makes up on average 22% of a total website’s page weight on mobile devices. After images and video, JavaScript is the third-largest source of page weight.
Below I’ll dive into a few different ways you can optimize JavaScript on your WordPress site.
Audit your plugins
Where does a majority of the JavaScript come from? Two places: theme and plugins. So the first recommendation is to do an audit of your plugins and get rid of the ones you can live without.
This is one reason I love using WordPress. There are so many different ways to accomplish things. If you go with another platform such as Shopify or Wix, you’re stuck doing it one way or worse; you don’t have a way to fix it at all.
Over the years, here are a few plugins I’ve gotten rid of on my sites:
- Scroll to Top Button: Scroll to top buttons are already included in the GeneratePress theme. However, I just ditched scroll to top altogether as I don’t think many users even click them.
- Bloom: This plugin has too many requests, so I switched back to the MTS WP Subscribe Pro plugin.
- TablePress: A great plugin, but the block editor in WordPress now has responsive tables, and so does GenerateBlocks.
- TweetDis: I switched to Novashare, our social sharing plugin for WordPress, which includes a tweet shortcode and tweet block with a more optimized codebase.
- Crayon Syntax Highlighter: I switched to the native WordPress code syntax without any plugin.
- Mango Buttons: I switched to native buttons in the GeneratePress theme.
- Table of Contents Plus: I’m hardcoding these now. The WordPress block editor now has an easy way to add anchors.
As you can see, there were some plugins I didn’t need, or there better alternatives. By getting rid of these, I significantly reduced the requests on my site and the total page size. I advise you do a plugin audit and assessment on your site right away!
Local Google Analytics
Ironically Google Analytics has its own set of issues with performance. First, you have an immediate third-party DNS request. Second, and the more significant problem is with the cache expiration time. Google sets the cache expiration very short, and this can cause warnings to show up.
An easy way to resolve these issues is to host Google Analytics locally on your server or CDN. There are a couple of advantages to this:
- You take advantage of a single HTTP/3 connection.
- Your Google Analytics script gets the caching headers from your server and or CDN.
- There is one less immediate third-party request.
Hosting analytics locally isn’t officially supported by Google, but many have been doing this for years. You can easily host Google Analytics locally with our Perfmatters plugin. It supports Universal Analytics and Google Analytics 4.

If you want a Google Analytics alternative, I highly recommend Fathom Analytics. It’s privacy-focused, GDPR compliant, and the script is lightweight (under 3 KB).
Defer JavaScript
Due to the nature of how JavaScript works, you’ll most likely see an “Eliminate render-blocking resources” warning from Google. This means your JavaScript files slow down (block) the first paint of your WordPress site’s page when loading.

An easy way to speed up the paint of a page is to defer all non-critical JavaScript. This means the scripts will load after the rest of the page has loaded. You’re basically pushing them to the bottom of the waterfall. This is done by adding a defer attribute on each JavaScript file.
You can easily defer JavaScript in our Perfmatters plugin.

It’s important to note that you can’t defer jQuery core (jquery.js) on most sites, especially larger ones. It all depends on the loading order of your JavaScript. If something needs it to load right away, it will cause a cascading error.
Minify JavaScript
Minification is the process of removing all the white space in your code. A lot of developers minify their scripts beforehand. You can spot this quickly if the script has .min.js on the end. (Example: file.min.js). Therefore, this isn’t a huge priority because 90% of your JavaScript is probably already minified.
With that being said, you can still minify your JavaScript. For this, I recommend the free Autoptimize plugin. Or, if you’re using Cloudflare, you can easily enable minification for JavaScript under the “Speed → Optimization” tab.

Delay JavaScript
While deferring JavaScript pushes the script to the bottom of the page load, you can alternatively delay JavaScript based on user interaction. This can be a great way to speed up the paint of the page for Core Web Vitals when something isn’t needed right away. Especially heavy third-party scripts like Google Adsense, Google Analytics, conversion pixels (FB, Google Ads), etc.
It also works great for things like cart fragments, which is a common WooCommerce performance issue.
Read more about delaying JavaScript with our Perfmatters plugin.

Remove unused JavaScript
Next, you have the warning from Google to “remove unused JavaScript.” This means not all the code from the JavaScript file loaded (from your WordPress theme or plugin ) is being used on the page you’re testing.

There are a couple of ways to tackle this issue. However, I can’t express how important this is. If you follow all the advice above regarding a lightweight WordPress theme and ditching page builders for an alternative like GenerateBlocks, unused JavaScript will not be a huge issue.
Google first recommends what we covered above, and that is to reduce or switch the number of WordPress plugins loading unused JavaScript. Remember, the number of plugins isn’t as important as how well they’re coded.
You can use Google’s code coverage feature in Chrome DevTools to identify the theme or plugin responsible for adding extraneous JavaScript. Look out for the scripts in the list which have a lot of red in code coverage. A theme or plugin should only enqueue a script if it’s actually used on the page.
That’s where our Perfmatters Script Manager comes into play. It lets you disable scripts, queries, and inline CSS/JS on a per post/page or even sitewide basis with a click of a button. You can also disable entire plugins. This is very powerful and can drastically increase the speed of your site (especially your homepage).

The Script Manager also supports Regex. This allows you to disable scripts on dynamically generated archive pages, search results, etc. Basically, any script combination you can think of can be disabled or enabled.
By going through and optimizing your site, you can drastically reduce the amount of JavaScript loading. This won’t completely fix the unused JavaScript warning, but it will help a lot.
You can also use the delay JavaScript feature in our Perfmatters plugin to resolve unused JavaScript warnings.
10. Optimize CSS
Impact: Front-end speed.
According to The HTTP Archive, as of 2021, CSS makes up on average 4% of a total website’s page weight on mobile devices. After images, video, and JavaScript, CSS is the fourth-largest source of page weight.
Below I’ll dive into a few different ways you can optimize CSS on your WordPress site.
Reduce custom CSS
The very first thing you should do is reduce any custom CSS on your WordPress site.
It’s natural to add CSS in the WordPress Customizer and then bounce to the next problem when you’re in a hurry. However, this means over time, you’ve probably accumulated extra CSS you don’t need. Or you’ve changed themes or plugins, and the CSS isn’t even applicable anymore. Now’s the time to go back and clean it up.
I also don’t recommend using a third-party plugin for CSS. While plugins like Simple Custom CSS are great, the WordPress Customizer has gotten quite good over the years and now does basic syntax coloring and error correction.
Load custom CSS only where needed
There are times when you might need to add some custom CSS to your site, but it doesn’t necessarily need to load everywhere. If you drop it in the WordPress Customizer, this is bad! Because it will load it across your entire site.
This is where GeneratePress and hooks come to the rescue. You can create a hook with GeneratePress, add your custom CSS, and select where you want it to load.
For example, on my contact pages, I have some custom CSS for my NinjaForms contact plugin. I have a GeneratePress hook that loads this code only on my contact page. This is the most optimal way to load custom CSS.

Minify CSS
Like JavaScript, a lot of developers minify their stylesheets beforehand. You can spot this quickly if the file has .min.css on the end. (Example: file.min.css). Therefore, this isn’t a huge priority because 90% of your CSS is probably already minified.
With that being said, you can still minify your CSS. For this, I recommend the free Autoptimize plugin. Or, if you’re using Cloudflare, you can easily enable minification for CSS under the “Speed → Optimization” tab.

Remove unused CSS
Like JavaScript, you might have the warning from Google to “remove unused CSS.” This means not all the code from the CSS file loaded (from your WordPress theme or plugin ) is being used on the page you’re testing.

There are a couple of ways to tackle this issue. However, I can’t express how important this is. If you follow all the advice above regarding a lightweight WordPress theme and ditching page builders for an alternative like GenerateBlocks, unused CSS will not be a huge issue.
Google first recommends to reduce or switch the number of WordPress plugins loading unused CSS. Remember, the number of plugins isn’t as important as how well they’re coded.
You can use Google’s code coverage feature in Chrome DevTools to identify the theme or plugin responsible for adding extraneous CSS. Look out for the scripts in the list which have a lot of red in code coverage. A theme or plugin should only enqueue a stylesheet if it’s actually used on the page.
Again, that’s where our Perfmatters Script Manager comes into play. It lets you disable scripts, queries, and inline CSS/JS on a per post/page or even sitewide basis with a click of a button. You can also disable entire plugins.
By going through and optimizing your site, you can drastically reduce the amount of CSS loading. This might not completely fix the unused CSS warnings, but it will help a lot. You can then use our Perfmatters plugin to automatically remove unused CSS. This should clear up the rest of the warnings. It will also fix “eliminate render-blocking resources” warnings regarding CSS.

Removing unused CSS will also help lower FCP and LCP. In fact, on many of my sites, it made the difference between URLs still “needing improvement” and scoring “good” or green across the board for Mobile and Core Web Vitals.

11. Optimize HTML
Impact: Front-end speed.
According to The HTTP Archive, as of 2021, HTML makes up on average 1.5% of a total website’s page weight on mobile devices. While this is not a large amount, it’s still important.
Below I’ll dive into a few different ways you can optimize HTML on your WordPress site.
Serve HTML from Cloudflare edge
I touched on this above; I recommend using Cloudflare APO. With a traditional CDN, your HTML is served from the origin server while your assets are served from the CDN. With Cloudflare APO, your assets and your HTML are served from the CDN. Think of it as more like converting your WordPress site into a static HTML site. This results in insanely fast speeds and low TTFB.
Minify HTML
Like JavaScript and CSS, you can minify your HTML. For this, I recommend the free Autoptimize plugin. Or, if you’re using Cloudflare, you can easily enable minification for HTML under the “Speed → Optimization” tab.

12. Misc. optimizations, resources, and tips
I’ve optimized thousands of WordPress sites over the years, so I thought it would be helpful to include another section which miscellaneous optimizations, tips, and resources. Many of these are things I see daily working with clients.
- Don’t use Google AMP. Focus on making your responsive site faster, and don’t lock yourself into an ecosystem where you have less control. As of 2021, Google no longer gives preferential treatment to those using it (source), and AMP symbols are no longer displayed in SERPs. See how to disable AMP safely.
- Be very careful with Google Maps and just dropping this in the footer of your site. It’s terrible for performance due to its large transfer size. I’ve seen one map generate up to 26 HTTP requests (that’s not a typo). I recommend using our Perfmatters plugin to disable Google Maps where it shouldn’t be loading. Or get even more creative, and replace it with a well-designed image with CTA and an external link to Google Maps.
- If you’re running ads, don’t use Ezoic. Their platform doesn’t play nice with third-party optimization plugins and creates a silo for your site, meaning you have less control. I highly recommend using Mediavine instead. They have a fantastic team and fully support third-party plugins. I even use them for one of my sites.
- Ditch your sliders and instead use a static header. Sliders cause horrible layout shifts (CLS) for Core Web Vitals, especially on mobile. They also negatively impact your conversions.
- Don’t use animations if you don’t have to, especially with page builders like Elementor. These increase CPU, JS, CSS, and rendering time. And it adds up really fast. Using static elements is always the best for performance.
- Don’t combine your CSS or JS. This is a deprecated technique since HTTP/2 (now HTTP/3/QUIC). It’s faster to load your individual files in parallel. It also makes troubleshooting performance issues a lot easier.
- Little things matter. For example, I decided to turn off my “scroll to top” button. This means one less JavaScript file loading. I realized as a user; I never click these.
- Use Yellow Labs Tool to do an audit of your site’s code. This can be a great alternative view of things to optimize on your site, different from Core Web Vitals or GTmetrix.
- Load your Gravatars from your CDN and lazy load them.
- Google’s reCAPTCHA is a performance killer. I’ve seen it drop mobile scores by over 30 points by itself. It loads 12 scripts at a total size of 480 KB, which is huge. The important thing is not to use it sitewide. At most, make sure this is only loading on your contact page. However, most contact form plugins have anti-spam and honeypot measures already built-in. If yours doesn’t, you can use a free plugin like WP Armour or Simple Cloudflare Turnstile. Check out these great reCAPTCHA alternatives.
- If you’re using Cloudflare, turn off Rocket Loader. This feature is supposed to help speed up mobile sites, but all I’ve seen it do is slow them down and cause problems. Turning it off will also get rid of a request on your site (
rocket-loader.min.js). - If you’re using Cloudflare, turn off Email Address Obfuscation. First, you shouldn’t be putting your email address anywhere in plain sight. It’s just asking for spam. Contact forms exist for a reason. Second, turning this feature off will also get rid of a request on your site (
email-decode.min.js).
Newsletters
Below are a few newsletters I recommend taking the time to subscribe to as they provide incredible insights into the web performance and development industries.
- wdrl.info: A handcrafted, carefully selected list of web development-related resources. Curated and published usually every week. Run by @helloanselm.
- weekly.statuscode.com: A weekly newsletter on web operations, infrastructure, performance, and tooling, from the browser down to the metal. Run by @cooperx86.
- kinsta.com: A weekly newsletter with WordPress tips and strategies to drive more traffic and revenue to your business! Being that Kinsta is a high-performance hosting company, many of the articles are focused on performance.
- keycdn.com: Webperf, webdev, WordPress, content delivery, once a week.
- smashingmagazine.com: Smashing Magazine is an online magazine for professional web designers and developers. Useful tips and valuable resources, sent out every second Tuesday.
Utilize our Perfmatters plugin
Impact: Front-end and back-end speed (WordPress admin dashboard).
Our Perfmatters plugin can help resolve many of the Core Web Vitals warnings. It also includes all the tweaks we use on our sites to gain an edge over the competition.

These features, some of which we dove into above, include:
- Optimize your database (revisions, spam, trash, transients, and more).
- Lazy load your images, iframes, YouTube videos, and more.
- Preload resources and prefetch links for instantaneous load times.
- Defer JavaScript to fix render-blocking resources.
- Delay JavaScript on user interaction to fix unused JSS.
- Remove unused CSS.
- Disable scripts, queries, and inline CSS/JS on a per post/page basis or even sitewide basis with the Script Manager.
- Disable emojis, self-pingbacks, XML-RPC, embeds, and more.
- Host Google Analytics locally.
- CDN rewrite (hook up your favorite CDN provider).
- Change your WordPress login URL (decrease bot traffic and protect your site).
- Disable and or limit WordPress revisions.
- Change frequency and or disable Heartbeat API. This can help fix admin-ajax.php slowness.
- Change the autosave interval.
Avoid redirects
Impact: Front-end and back-end speed (WordPress admin dashboard).
Every redirect you add to your site will affect performance, even if just a little bit. The big problem with many popular WordPress plugins is that they use the wp_redirect function (especially those running on Nginx).
It means every incoming redirect will have to execute PHP code on your server to process and forward the request. While this might not sound bad, imagine you have 2,000 redirects (which is very common), and your site gets 500,000 visitors per month. There will be a lot of users hitting your redirects.
A better way to handle WordPress redirects is at the server level. This way, you can bypass a layer and not have to execute any code on your server.
A WordPress hosting provider like Kinsta lets you manage all your redirects in their MyKinsta dashboard. Everything is done at the server level, and there’s less bloat in your WordPress database.

Disable WP-CRON
Impact: Front-end and back-end speed (WordPress admin dashboard).
WP-CRON is a task scheduler for WordPress. The problem is that it checks the list of scheduled tasks that need to run on every page load. On high-traffic sites, this can quickly become a performance issue. Thankfully, you can disable WP-CRON and instead use a server-level (system) cron.
Note: I don’t recommend this for every WordPress site. But if you see high cron activity and you think it might be slowing down your site, it’s a good thing to try.
To disable WP-CRON, add the following to your wp-config.php file, right above the line that says “That’s all, stop editing! Happy blogging.”
define('DISABLE_WP_CRON', true);After it’s disabled, you will have to call wp-cron.php from your server or a third-party service to ensure scheduled tasks still fire off properly on your WordPress site. The benefit is that you can have it run on a schedule, instead of all the time.
If you’re hosting with a provider like Kinsta, and have WP-CRON disabled, their server-side cron triggers wp-cron.php every 15 minutes automatically. No extra setup is necessary.
For more information, Tom Mcfarlin has a good article on how to properly set up WordPress cron jobs.
13. Speed test results
Now for the fun part. Here are the speed test results for a couple of my sites. These include blogs, ecommerce, small business, etc. All of them were built entirely with blocks using GeneratePress and GenerateBlocks.
I’m including both Google Core Web Vital results as well as GTmetrix results. Both of these are tools I regularly use to gauge improvements as I’m doing optimizations. Remember that Google Core Web Vitals is emulating the test from a mobile device. The GTmetrix tests are on the desktop.
woorkup.com
This is a blog.
Google Core Web Vitals

GTmetrix

perfmatters.io
This is an ecommerce site.
Google Core Web Vitals

GTmetrix

nogluten.com
This is a heavy Google AdSense property that uses the popular Mediavine ad management network. It makes all of its revenue from advertising. As you can see, it’s still possible to score well even when running ads. Following every optimization mentioned above becomes even more critical in this scenario.
Google Core Web Vitals

GTmetrix

Don’t waste time chasing a perfect 100 score
A few years ago, I was the first to say PageSpeed scores don’t matter. And that was true then. However, times have changed. With the release of Google Core Web Vitals and the fact that it’s now a ranking factor, scores due to matter to some extent. You have to get out of the mindset of total load times and shift your focus to how your page is loading.
The good news is that scores usually correlate a lot better now with total load times than they did in the past. As you get a higher score, you will hopefully achieve faster load times. And remember, we are always talking about mobile these days as that is what Google is using for Core Web Vitals.
With that being said, I urge you not to waste too much time chasing a perfect 100 score. I don’t; I generally aim for the thresholds. There is such a thing as over-optimizing your site. If you’re in the green, then spend your time building your business. What good is a ranking factor if you have horrible content? Chasing down a perfect score can easily be a waste of time.
Thinking beyond scores, you should also keep perceived performance in mind. Perceived performance is how fast your site feels to a person visiting it. If your site’s perceived performance is bad, this can have a direct impact on your bounce rate and time on site. And these are also factors Google uses.
14. Convert site or get a performance audit
If you still aren’t satisfied with your speed, here’s what I recommend doing.
Convert your site to GeneratePress + GenerateBlocks
First off, if you’re using a bloated theme or page builder, I always recommend moving to a lightweight theme like GeneratePress (along with GenerateBlocks). Their codebase is super lightweight and developed from the ground up with performance in mind. Sometimes you have to fix the base layer of your site and then everything else will fall into place.
If you don’t have time to do this yourself, I recommend reaching out to my friends at WP Boosters. They can convert your existing site and design to GeneratePress + GenerateBlocks.
Get a web performance audit
If you need additional help, I recommend getting a full web performance audit of your WordPress site. One day I might offer these, but currently, I don’t have time. For now, I highly recommend Mike Andreasen, a Codeable expert, for web performance audits. Below is an example of a client’s site before and after Mike’s optimizations.

I chat with Mike regularly. He’s one of the few web performance folks out there with whom I agree on just about everything regarding optimization, which services and tools work the best, etc. And trust me, that’s rare.
He’s completed over 1,300 projects for clients. I can personally vouch for his work as I have the graphs, speed tests, and actual clients’ data to back it up!
Summary
When it comes to speeding up WordPress, it can feel like a full-time job. But it doesn’t have to. If you pick the right solutions from the beginning, from hosting, to themes and plugins, to following best optimization practices, you can achieve the speeds you want. However, if you try to skip one of these steps, you’re probably not going to be happy with the results.
I see so many clients that almost do everything right. But they have poorly coded theme or page builder killing their performance. Or they chose a quality theme but are on a cheap hosting provider. You need to follow all of the advice above.
Web performance is like an orchestra; every part plays a vital role in achieving the final masterpiece, or in this case, those coveted scores. 🎷⚡Click to PostAnd yes, it can take a little work to get there. The good news is, everything above you can easily apply to all of your WordPress sites going forward. You’ll eventually get to the point where getting those Core Web Vitals scores aren’t such a big deal.
I also understand it can be difficult for those of you working with clients. All they care about is a faster score. They don’t understand what needs to get done, purchased, or optimized. Trust me; I feel your pain, and I’ve been there.
If you’re dealing with a frustrating client, my best recommendation is to forward them this blog post. You might be surprised by their response. You might also have to explain to them that they’ll need to invest a little money to get there. Once they understand that there isn’t just a magic switch, you can flip; you can start making progress.
Make sure to bookmark this post as I’m continually updating it. Everything I do from now on is entirely focused on Google Core Web Vitals, including the development of our Perfmatters plugin.
Hopefully, some of the tips and recommendations on how to speed up WordPress have been helpful or eye-opening for you. I would love to hear any feedback below!
Is there any solution for a website with a really slow hosting?
Unfortunately, slow hosting is like running on a car with a bad engine. It’s going to be almost impossible to get away from the bottlenecks slowing everything else down.
The best recommendation I can give would be to use Cloudflare and APO. https://woorkup.com/speed-up-wordpress/#cloudflare That will help as Cloudflare will get hit most of the time, instead of the hosting provider. However, whenever the cache is cleared or expires, the request goes to the hosting provider, which would be slow. And Google Web Core Vitals will pick up on this. That’s why every layer must be using a fast solution.
Hi. Very useful article. Checked my host company on EIG list abs DreamHost was not in it. Is that a reliable hosting company or also part of BlueHost?
Kind regards
Morten
Hey Morten,
EIG doesn’t own DreamHost, but I wouldn’t personally recommend them. I’ve worked with thousands of clients across a broad spectrum of hosting providers, and most DreamHost customers struggle to get the performance they really want. Kinsta and SiteGround are the only two hosting providers I recommend.
They are the fastest to adapt to the latest technology such as PHP 8.0, adding new Google Cloud data centers, etc. They are both independently owned, which is one of the reasons this is possible. They don’t have investors pulling strings. Kinsta is about to roll out Cloudflare APO to all customers for free, which is a gamechanger. Kinsta also includes Google Cloud’s C2 compute-optimized VMs on all their plans. These are the fastest machines Google has on the market.
Great explanation on your part Brian! As Google will take more consideration on website speed these informations will be very useful. Website speed is vital to rank your keywords on Google SERP.
Thanks Yakub! Completely agree, web performance is a vital part of achieving good results in SERPs.
Brian,
Great post. I have been following your posts and sites for a while and always find them highly useful. I am now ditching classic editor and elementor (oh how I loved them) for Gutenberg and Generateblocks.
I just wanted to point out on thing that I think could be updated. Regarding the CDN, you recommend KeyCDN (I have used them since you first made that recommendation). I think they are good and very affordable, but there is now a new player in the same space that uses the stackpath CDN. Bunny CDN (bunny.net) is actually very good and I think they are better than KeyCDN. I would check them out. I am not affiliated, just want to give a suggestion to another user who might find it helpful.
Great article. I’ve read a ton of speed optimization articles for Wordpress and this is the best one I’ve come across. I’ll give these things a try!
Thanks Devin! Glad you like it. If you have any questions about how we’re doing something in terms of optimization or performance with WordPress, feel free to ask.
Can you please tell me which site library you used from GeneratePress on this website?
Hey Syed,
I didn’t use the site library, just the options in GeneratePress. However, Tom, the developer of GeneratePress, did add the “Marketer” site library template to look like woorkup. :) That can be a quick way to get a site looking like woorkup, or at least very close.
I document everything regarding GeneratePress in my review: https://woorkup.com/generatepress-review/ My CSS can be found here: https://gist.github.com/brianleejackson/08089718e5007cb1f45bea58fa0bed98
Brian:
To load custom css with a hook, would you use a hook of wp_head or something else?
Hey Alan,
Yes, typically custom CSS would go in
wp_headbecause it will be needed sooner in the load order. The nice thing about the hooks is that you can control where the custom CSS spits out. It’s great for things like styling a contact form just on the contact page, as that CSS shouldn’t be needed anywhere else.If a large piece of code isn’t used, it will generate an unused CSS warning in Core Web Vitals. That’s why it’s not recommended to just dump all the CSS in the WordPress Customizer unless all of it’s needed across the entire site.
Hi Brian,
I am now hosting with Kinsta and purchased GeneratePress. As you know, Kinsta has its own CDN service, but in your article, you recommend these other two services, what do you think about Kinsta CDN service?
Thanks,
Patricia
Hey Patricia,
Glad to hear it! Kinsta CDN is actually powered by KeyCDN right now. So it is one of the two that I recommend above. :) Also, Kinsta is in the process of moving everyone to Cloudflare and is going to be including Cloudflare APO for free to all Kinsta clients. So this is pretty awesome!
I’m trying to use Perfmatters to locally host Google Analytics. When I add my GA tracking ID to Perfmatters and click to “Enable Local Analytics,” I don’t find my GA tracking ID on the front end when I “View Source.” Is there something more I should do?
Hey Chad,
Which version are you trying to add? If you’re logged in, make sure to check the “Track Logged In Admins” option. Otherwise, you would need to check it in incognito mode. By default, it doesn’t track logged-in users. Feel free to open up a ticket if you need help: https://perfmatters.io/contact/
Brian, what a well-written and informative article! It is by far the best I’ve seen to date. I bought your Perfmatters plugin yesterday and started using GeneratePress with GenerateBlocks a while ago. At least I’m doing some things right, but I still have some ways to go. This article will now become my manual for speeding up my websites. Thanks so much!
Hey John,
Glad to hear my article has been helpful. We have a lot of exciting updates we are working on for Perfmatters. :)
Hi Brian. Thanks for your amazing article! I’ve gone through it step by step and optimized as much as possible. My site has never loaded this fast!
Just one question regarding Cloudflare’s APO. I’ve noticed that whenever I publish a new article, that the home page doesn’t update immediately. Instead the cached version is served to users, without the new article. I’ve done a little digging around Cloudflare forums and it seems as if the Cloudflare plugin should automatically trigger a cache purge when you make changes to the site. However, I can’t seem to get it to work.
Did you also have this problem?
Hey Benjamin,
Glad to hear it! Yes, Cloudflare should automatically purge the cache whenever you publish a new post. However, remember that there are usually two layers of cache. There is your server/site cache, and then Cloudflare cache (APO). For example, my sites are at Kinsta, so they automatically purge the homepage when a new post is published. And then Cloudflare does as well. So both layers are automatically cleared. I’m wondering if your server/site cache is not being purged perhaps?
Thanks for sharing this post with us. I’ve been struggling with speed and never received advice like this. I’ll give it a swing, then.
Hey Malik,
Happy to help! I’m continuously updating this article with performance optimization tricks we use on all of our WordPress sites, so make sure to bookmark it.
Hi Brian,
A great article and not only does it re-enforce my own 25 years of hard earned understanding, it also contains many tips and explanations that will keep me off tracks I shouldn’t be on! And Perfmatters is a great weapon to have :-) I’m getting 96 to 100 on all parameters on many sites, and I’m using Elementor…
Thanks! Ken
Hey Ken,
Glad to hear you like the content and Perfmatters. I’ll make sure to keep updating this post as web performance is always changing.
Hey Brian! This post has helped me out tons! Production has been UP and things are going smoother than ever. I appreciate that you always continuously update it here to give the latest tips. Thanks a lot, Brian. Cheers!
-Malik
Hey Malik,
Glad to hear the content was helpful!
Hey Brian, thanks a lot for this actionable article. I not only love it but also using in my own blog i.e. webslearner.com. My speed was below 70, but after implementing your techniques it goes to 90+ in every page.
Awesome, glad to hear it!
Thanks for this post, Brian. I only wish I found it sooner!
Hey Brian great article. Just wanted to let you know that EIG changed its name to NewFold Digital. So you we can warn your readers about them :D
Hey Salvador,
Thanks! I’ve updated the note about EIG/Newfold Digital.
Hey Brian, I love your content. I follow your tutorial for my website but still I have some issues with INP value. I am using Generatepress marketer. Could you kindly share your recent Perfmatters settings for woorkup.com? I believe this would be really helpful.
Thanks, glad to hear it!
GeneratePress in itself generally shouldn’t have any INP issues. Do you have any third-party scripts or ads running? These are usually the worst INP offenders. I would check our doc about INP here: https://perfmatters.io/docs/interaction-to-next-paint/